Showing posts with label vegetarian. Show all posts

April 12, 2015

Spinach and Artichoke Bites


Did you guys know that it's Camp NaNoWriMo time? Because it is. And I always forget about April sessions, because April was always Script Frenzy month, except now Screnzy has been absorbed into Camp NaNo.

Have I lost you yet? I'm sorry. I forget sometimes that not everyone is fluent in WriMo-ese.

Anyway, April came before I remembered to have a "I don't have a plot" freak out, which ended up being a good thing, since I only had one plot idea rattling around inside my head. And that was originally meant to be the plot to a video game, but since I have no idea how to develop a video game, it's now been turned into interactive fiction. (Think Choose Your Own Adventure novels meet text based gaming. A great example are Choice of Games)

A while back, this idea for a game hit me, out of the blue, sort of a dystopian twist on the stereotypical dating sim. I actually love dating sims (also known as otome games or visual novels)(It's one of the few ways I'm totally girly. When I'm not summoning eidolons or restoring the Balance, obvi), but the biggest problem is that the grand majority of them follow the exact same format. I wanted to put my own twist on it and actually use the generic format to my advantage.

If I finish, you guys will totally play it, right?
If you're in the middle of writing an interactive fiction novel and still need to make an appetizer, these Spinach and Artichoke Bites are so quick and easy that you won't have to spend too much time away from your keyboard.

I am the segue master!

Seriously though, these bites were a last minute thing I decided to make for Easter since I had an extra sheet of puff pastry in the freezer from making my Mac 'n Cheese Pie, and an extra block of cream cheese from making my brother's Cheesecake Stuffed Portal Cake, and since my parents were having people over, I decided to put them together with spinach and artichokes to make a fancy appetizer.

And I guess they really were super fancy, because my aunt thought they were the frozen appetizers you get from the store. Then she ate one and was surprised at how good they were.
Everybody was all, "Kim made these?" and they were impressed and that confused me. I tried to explain that it was a simple matter of putting spinach and artichoke dip into puff pastry and baking it. I guess if you're not the type of person that has random sheets of puff pastry lying around, these just seem a lot more labor intensive than they are.

Trust me though, these are beyond easy to make. The filling takes little more than a bowl and a spoon to bring together. Then you cut the puff pastry into squares and put it in a mini muffin tin. Put a spoonful of filling into the pastry and bake. That's it.

Added bonus, these are perfect make ahead appetizers. I made them the day before, brought them over in a foil pan, and my dad stuck them in the oven alongside the ham for 10 minutes. Easy peasy.

Spinach and Artichoke Bites
Yield: 32 bites

Ingredients
1 (8 oz.) pkg. cream cheese, softened
1/3 cup mayo
1/2 cup grated parmesan cheese
1 (14 oz.) can artichoke hearts, drained and chopped
1 cup frozen chopped spinach, thawed and drained
2 cloves garlic, minced
Salt and pepper, to taste
1 package (2 sheets) puff pastry, thawed according to package directions

Directions
Preheat the oven to 425 degrees F.

In a large bowl, mix the cream cheese and mayo together until smooth. Add the cheese, artichokes, spinach, and garlic, and mix until well incorporated. Season as desired with salt and pepper.

Spray a mini muffin tin with non stick cooking spray. Cut the puff pastry into even squares (16 per sheet) and press the squares into the muffin tin. Fill with the spinach artichoke mixture and bake 10-15 minutes until the edges start to turn golden brown. Allow to cool slightly before serving.

Recipe adapted slightly from Park House Love

Things you may need:


So, you probably don't need No Plot? No Problem!, but if my various, effusive ramblings about NaNoWriMo have ever interested you, I totally recommend it. It was written by NaNo founder Chris Baty, who is funny and cool and awesome and signed my copy. :P


*Disclaimer: This post contains affiliate links*

December 14, 2014

Yeast Free Pizza Crust


So, long time no see, eh? I'm sorry I've been missing for so long, but I've had a lot on my plate recently. It's not the kitty butt. He's fine. We're off of pills and all the ickiest of his meds, just on his inhalers and oral gel.

It's me. I'm kind of... unemployed at the moment. I didn't get fired or anything. You see, I never actually worked for the company where I worked, if that makes any sense. I was a part of the facilities management company, and they ended our contract. It happens, of course, but they hired a new company that's so completely unprepared for this place that I'd feel sorry for them if I didn't think they were an awful company to begin with. The woman they hired as my replacement had zero experience with Excel, Outlook, or apparently any kind of office phone (she asked me if she had to hit transfer when calling an extension. There was no transferring involved).

The funny thing is, people started coming out of the woodwork, completely upset by this news. I always pretty much figured I was furniture to these people. I had a job, I did it, no big deal, and if there's a decor change, who really cares. But I had people coming up to me, telling me they'd miss me, telling me I could use them as a reference if I needed it, telling me that what was happening was unfair.

But the thing is, I'm not really that upset by it. Sure, I'll miss the paycheck, but I'm on unemployment and I've got some money saved up, so I'll be okay. And yeah, I thought the whole thing was handled poorly (the guy in charge of the whole thing wasn't even man enough to show up our last week), but I was so desperately unhappy there, that this is almost a relief. That place left me with no energy to go anywhere after work or on the weekends. I'd been neglecting my friends and my house. I hadn't even had the energy to cook. So for now, I'm looking at this whole situation as an opportunity. I can catch up on the blog, finally finish organizing my house, work on a project I started almost a year ago that could mean some extra cash flow. Meanwhile, I've been looking into some work from home opportunities that will allow me to continue to do all of this with an income that's not subsidized by the state

So now that I've got all those big life decisions out of the way, let's move on to the good stuff: pizza.
This is my newest favorite way to make pizza. As you all may know, I'm not a planner. So yeast doughs and I are not exactly the best of friends. If I ever wanted to make pizza, I'd either have to get the crust from the grocery store (and since that's not one of my grocery staples, and we've already been over how little I like doing that, that almost never happens), or start it in the morning, which is something I almost never remember to do.

But now that I have this yeast free recipe, I can whip up a pizza from scratch in less time than it takes to get it delivered. Plus, it only uses ingredients I always have in my kitchen, so even on the days when I have very little food around because I haven't been grocery shopping in 3 weeks, I can still make pizza.
The crust is just flour, water, and baking powder with some seasonings. That's it. Mix it up, knead it a couple times, press it into a pan (I used a rimmed baking sheet) and bake for a couple minutes before adding the toppings. I made a quick sauce out of a can of crushed tomatoes with basil (another pantry staple). I cooked it down with a little water, a couple bay leaves, some sugar because it was kind of bitter, and seasonings (oregano, garlic, onion powder, and a little crushed red pepper). Topped it with some shredded mozz and a little bit of shredded cheddar to keep things interesting. I had some Italian-style chicken sausages that I'd bought on sale a while back, so I sliced those and put them on top. Liberally sprinkle with more oregano (I love oregano on pizza. Yum) and bake 10-12 more minutes.

The crust rises beautifully in the oven, even without the yeast. After baking, it's soft and chewy (I prefer leaving the crust a little thicker, but it makes a great thin crust too), but still sturdy enough to have no problems holding it. Flavor wise, I do miss the yeast-y flavor of a regular pizza crust a bit, but it's not a hugely noticeable difference. Plus, this is ready in 20 minutes, which more than compensates for the lack of yeast-flavor. And it makes great leftovers, which we all know I love.
I forsee a lot more homemade pizza in my future.

Yeast Free Pizza Crust
Yield: 4-6 servings

Ingredients
2½ cups all-purpose flour
2½ tsp. baking powder
1 tsp. salt (optional)
Italian seasonings, to taste (optional) (I used garlic, oregano, basil, and onion powder)
⅔ - ¾ cup water
Prepared tomato sauce and shredded mozzarella cheese, to top (use dairy free cheese for vegan)
Optional: meats or vegetables for toppings

Directions
Preheat the oven to 400 degrees F. In a large mixing bowl, mix together the flour, baking powder, salt and seasonings (if using). Add ⅔ cup water and mix with a rubber spatula until the dough comes together. If the dough is too dry, add the remaining water, a little bit at a time. Alternatively, if the dough is too wet, add up to 1/4 cup extra flour. The dough should be soft but not sticky. On a lightly floured surface, knead the dough for about 5 minutes.

Grease a baking sheet (or pizza pan) with olive oil or butter. Press the dough evenly into the pan, into about 1/2 inch thickness (you can go thicker or thinner depending on your preference). Bake for 5 minutes.

Remove the crust from the oven, and spread a thin layer of tomato sauce on top. Top liberally with shredded mozzarella and your desired toppings. Bake for another 10-12 minutes, until the cheese is melted and bubbly. Serve immediately.

Recipe adapted from Adventures in Coupons and Diethood

September 24, 2014

How to Make Pasta in the Microwave


So, my new stove and I are not the best of friends. The oven's fine, though I'm pretty sure I found a hotspot, but the stove totally frustrates me. It's an electric stove, and not an especially high-end one at that. My whole life, we had gas stoves, so I'm not used to using electric. And it's soooo sloooow. There's this "hot surface" indicator light so you don't accidentally burn yourself while it's cooling off, and that light doesn't even come on until I've had the burner on for at least 30 seconds. It's not so bad when I'm making chicken or something that requires prep, but it's torture when all I'm doing is boiling a pot of water for pasta. I'm Italian fer cryin' out loud, and I've been avoiding making pasta because it just takes too dang long.

Then I realized I could make a single serving pasta in the microwave. Now I'm eating pasta again and all is right with the world.

This isn't really a recipe, since I don't measure, but it's a technique I had to share.
The things you will need will be:

  • A microwave safe bowl (preferably one that is very wide and deep)
  • A microwave safe plate
  • Uncooked pasta, about 1 serving's worth (~2 oz)
  • Water-- enough to cover the pasta
You do not need a Kitchenaid or mums. They are attempting to hide the kitty meds that still managed to get in the frame.
Add the pasta and water to the bowl-- like I said, I never measure. I just pour out what looks like a decent sized serving of pasta and stick it under the faucet. (Just keep in mind that the cooked pasta will expand, so use less pasta than you actually want). The amount of water isn't fussy either: if you add too much, you can drain it off; if you add too little, you can add more while it's cooking.

The reason you want a wide and deep bowl is because the water will boil like nobody's business in the microwave. If your bowl is too small, it will boil over and make a mess. That's where the microwave safe plate comes in-- my bowls are actually the perfect size for this, but on the off chance it does boil over, it's caught on the plate and not all over the microwave.

There are sites that tell you you can do this in a mug. Do not listen to them. It will make a mess and there will be boiling, starchy water everywhere.
Microwave on high for 6-8 minutes. My microwave isn't especially high powered, so I need 8 minutes (and I like my pasta very firm-- you might need to leave it in even longer if you like softer pasta)
Stir every two minutes or so (if the pasta seems too dry, add more water). Test the pasta for doneness at 6 minutes.
Decide how you want to prepare your pasta. My favorite way is with shredded cheese (Mexican blend), salsa, and a pat of butter (about 1/2 tbsp). You could add fresh spinach, artichokes, and shredded swiss for spinach and artichoke pasta; cheddar, shredded or canned chicken, hot sauce, and butter for buffalo chicken pasta; even just mix in some garlic, olive oil, and fresh basil. Whatever your little heart desires.

Please note: a TARDIS does not actually help you make the pasta, but is always recommended.
Now, using pot holders because the bowl will be very hot, remove the bowl from the microwave. There will be a little water left in the bowl-- that's great if you're looking to melt cheese or wilt spinach (though if there's a lot, you may want to drain some out), so leave it in there. Add your mix-ins and stir it up.
Once the mix-ins have been melted/wilted to your heart's content and are well mixed, return the bowl to the microwave for another 30 seconds to 1 minute on high.
And serve! A bowl of fresh pasta has never been so easy and required so little clean up. Now, is it as quick and easy as Easy Mac? No. Easy Mac is specially formulated to be, well, easy. But is it still quick and easy, not to mention much tastier, healthier, and cheaper than Easy Mac? You bet your booty it is.

Just remember to be super careful handling the bowl after cooking, since it will be very hot. You could transfer the pasta to another dish, or you could do it my way and just wrap the bowl in a dish towel. That way you can still have it on your lap to eat while watching the season premiere of Sleepy Hollow (I have three words for you: naked Benjamin Franklin)

I have not tried this method with whole wheat or gluten free varieties, but I dare say it should translate. I'd just suggest using more water, since they tend to absorb more of it, and cooking times may need to be adjusted.
Technique adapted from various internet sources, but mostly from Ella Claire

June 25, 2014

Roasted Broccoli Grilled Cheese


Hello hello hello everybody! I'm back! Well, I'm not back back, since Viola's not up and running, I don't have my measuring spoons, and my light tent is still packed somewhere, but I'm back. And this is the first thing that I cooked in my new house so I'm sharing it with you!

And I also want to apologize for the pictures. I only had one sliver of countertop to take them on, and the window was a lot higher than I would have liked, so some of the lighting got a bit wonky. Oops. This is why I have a light tent. :D
So, I'm not usually a huge vegetable eater, but broccoli is one I usually like, and I definitely like roasted broccoli. I've had this recipe from 2 Peas and Their Pod pinned forever, so when I was looking for a recipe with easy prep (and basic ingredients, since I still have to finish stocking the pantry) so I could eat something other than pizza, I remembered this.

And the prep really is super simple. Just chop a head of broccoli into small florets, toss with olive oil, salt, pepper, and garlic, and stick it in the oven for 10 minutes. Butter two slices of bread, add cheese and broccoli, and grill in a hot pan. Voila: healthy, wholesome, tasty, and not pizza.
I put a yellow cheddar slice on the bread, added the broccoli, and then sprinkled it with shredded white cheddar, then topped it with another slice of yellow cheddar. This not only adds extra cheese, but keeps the broccoli from falling out of the sandwich.

If I was fully back up and running, I would have buttered the outside of the bread as per usual, but buttered the inside with roasted garlic, because garlic and broccoli are best friends and that would have been amazeballs. But I'm not at that point yet, so I had to make do with some garlic on the broccoli itself. Dipping it in tomato basil soup helped, too.
I wish I could tell you I had a recipe for the soup, but I don't. It's Campbell's. And it was tasty, so don't hate.

Roasted Broccoli Grilled Cheese
Yield 3-4 sandwiches

Ingredients
Florets from 1 medium head of broccoli, chopped small
2 tbsp. olive oil
1/2 tsp. salt
1/4 tsp. freshly cracked black pepper
1/4 tsp. garlic powder (optional)
6-8 slices of bread
Butter, softened
Cheddar cheese (I used a combination of yellow slices and shredded white)

Directions
Preheat the oven to 400 degrees F. On a sheet pan, mix the broccoli, olive oil, salt, pepper, and garlic powder, if using. Roast for 8-10 minutes, until the broccoli is evenly roasted, but not burnt. Allow to cool.

Heat a skillet on medium-low heat. Generously butter the bread on one side only. On the unbuttered side, layer cheese, broccoli, cheese, and another slice of bread (buttered side up). Grill in the heated skillet, flipping once, until both sides are golden brown. Serve hot.

Recipe adapted slightly from 2 Peas and Their Pod

January 5, 2014

Spinach and Goat Cheese Gnocchi


I feel like I'm out of practice with this whole food blogging business. Like, this whole mini-vacation I gave myself kind of screwed me over.

Like this recipe, it came from my photo archives. The archives, man. I don't archive. This is not how I do things.
But you know, it's all your fault. You said you wanted more savory dishes, even though this was always meant to be a primarily dessert blog (and crafts. Desserts and crafts. That's why I called it Treats & Trinkets). I don't do recipes when I cook savory. I do throw-things-in-a-pan-and-see-what-happens. But here I am, with a savory dish from the photo archives and now I'm all screwed up because of it, and it's all your fault.
Good thing is, I can cross something off of my foodie bucket list. I've wanted to try making gnocchi for a while now, and I stumbled across this recipe from Brokeass Gourmet when I just-so-happened to have some spinach and goat cheese in the fridge that needed to be used. The gnocchi was good, tangy, flavorful, and filling. Spinach and goat cheese is an a-plus combo in my book, and pasta is always a good thing, so when you put them together, something magic happens.

I also had some Roma tomatoes in the fridge that were on their way out, so I whipped up a simple tomato butter sauce (literally just tomatoes and butter, with some seasonings), but while it was good, it was a little too creamy to go with the gnocchi in my opinion. I'd suggest going with something lighter, or maybe even just toss it with some olive oil, minced garlic, and diced fresh tomatoes. You really want to give the gnocchi a chance to shine.
So here's your savory dish. I must admit, it was pretty tasty, and I'm glad I tried out something new. But can we please go back to our regularly scheduled sugar and butter posts now?

Spinach and Goat Cheese Gnocchi
Yield: 2 servings

Ingredients
1 cup packed chopped spinach
2/3 cup all-purpose flour, plus more for sprinkling
4 oz. creamy goat cheese
1 egg
1 tsp. garlic powder
1/2 tsp. salt
1/2 tsp. pepper (I used freshly cracked)
Pinch nutmeg
Olive oil, for frying

Directions
In a large mixing bowl, mix together all ingredients except for the oil until well incorporated. If the dough seems too sticky, add some extra flour. Gather the dough into a ball and wrap in plastic wrap. Chill in the refrigerator for about 30 minutes.

In a large frying pan, add just enough olive oil to coat the bottom and heat on medium-high. On a lightly floured surface, roll the dough into two thin logs, about 8 inches long. Cut them into one inch pieces.

Add the gnocchi to the prepared pan, and cook for about 2-3 minutes per side, until golden brown. Serve immediately.

Recipe adapted from Brokeass Gourmet

August 18, 2013

Homemade Uncrustables- For the Lunchbox #SundaySupper


Can I just ask you all something? Does anyone actually like to eat the bread crust?

Kids are allowed to not like the crusts. And if they refuse to eat the bread crust, we make it easy on them. We cut off their crusts for them, maybe use a special cutter to make it a cute shape, even buy pre-made, frozen peanut butter and jelly sandwiches just because they don't come with crusts. I honestly don't know of any other food that parents will so willingly discard a part of. And I think it's because everybody secretly agrees: crusts are icky.

But as adults, we feel like it's childish not to eat the crusts. It's a waste of our hard earned money, and we should be thankful that we have icky crusts to eat. And we can't buy those frozen crust free sandwiches for ourselves because they're too expensive, and we should really be eating something with better nutrition, and blah blah blah, pbbbbft.

Double standard much?

Look, I'm a sort of adult-type person. I have a full time job (pbbft), I own a car, I do my taxes. And I'm here telling you that if you want to bring an Uncrustable and a juice box with you for lunch, then by golly you should. No need to feel any sort of adult guilt, because I can show you how to make them cheaper, better tasting, and better for you than the ones you find in the store.

And, you know, you can make them for your child-type peoples too. But only if they're nice and share their candy.
I love Uncrustables, I really really do. I mean, we all know how much I love peanut butter, so it shouldn't surprise you that I love a good pb&j. And I hate the crusts. I force myself to eat them-- unless I'm sitting outside, and no one else is around, and I can throw them for the birds to eat-- but I still hate them. I used to buy Uncrustables in school when I was renting an attic and had no kitchen. I'd just grab one, stick it in my bag, and I'd have something quick and ready to eat on those marathon days when I had class for 7 hours straight with no break. I am not knocking the Uncrustables.

But, as with most things, a peanut butter and jelly sandwich is much cheaper to make on your own, and as a pre-packaged food, Uncrustables have that mile-long list of unpronounceable ingredients. (Plus, they contain malted barley flour, which I can no longer eat since I've discovered it gives me terrible headaches. So they're just big meany-pants) But it's also true that you can't beat the convenience of that ready-to-go sandwich sitting pretty in the freezer, all sealed up and ready to go.

Well if you can't beat them, make them yourself!

... You know what I meant.
You're gonna start with two slices of bread. You can use any kind you like: white bread, potato bread, multi-grain, whole wheat. I used my honey wheat sandwich bread (which is why my slices are a little squat: I baked it in a loaf pan that was a little too big)(Yes, I totally used fresh baked bread to make an Uncrustable. You ain't gonna find that in the freezer section.)
We start by cutting off the crusts. You're not going to want to forget this step, since it's kind of the entire point to this whole exercise. I cut as close to the crust as I could manage so there's less waste. You could save the crusts to make bread crumbs or something. Probably. Or feed them to the dog. That works too.
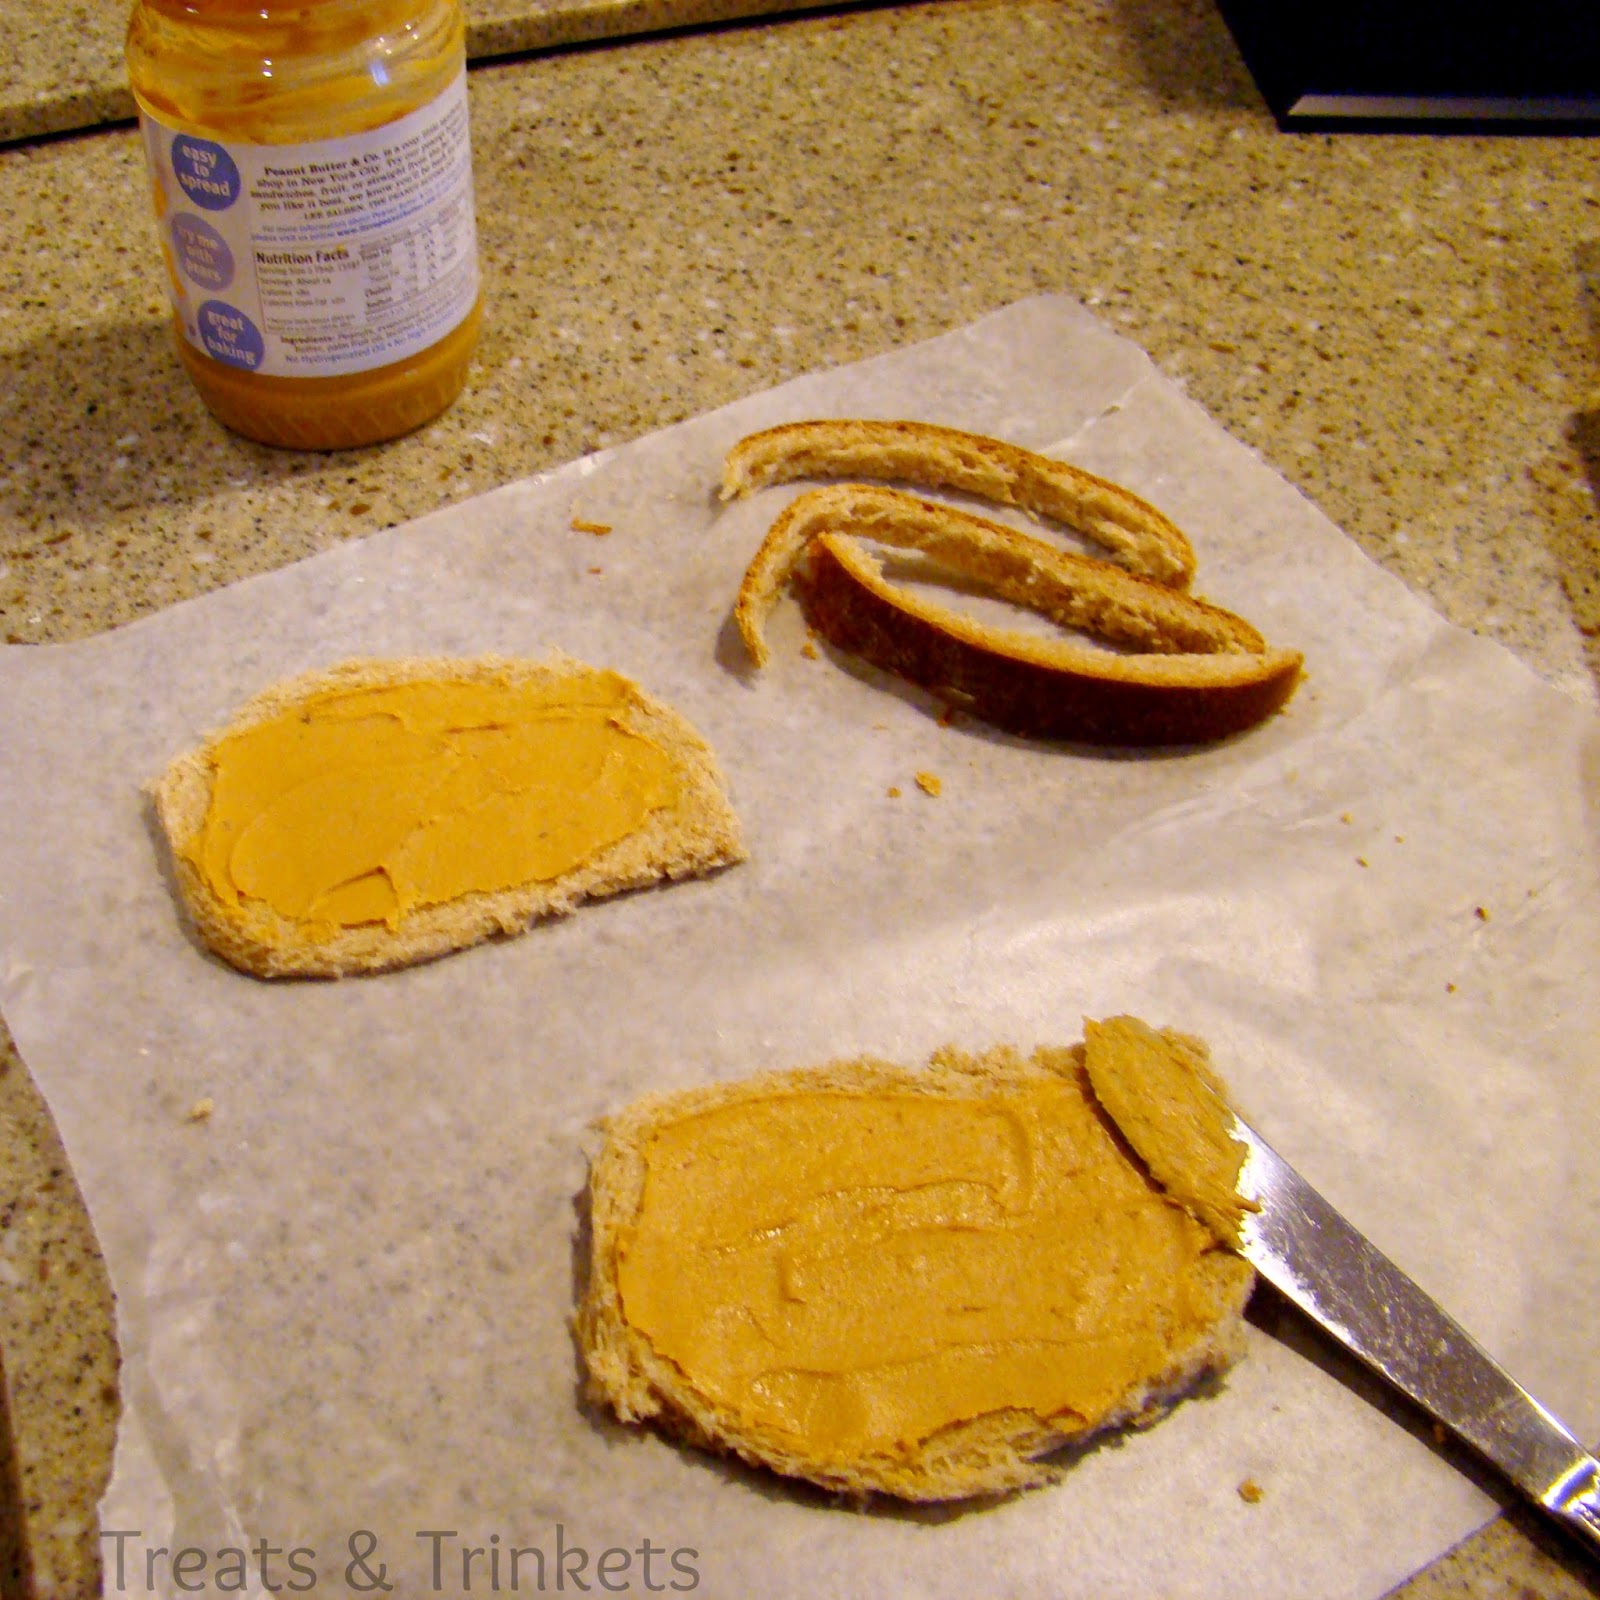
Next, roll out the bread with a rolling pin. You don't need to roll it out too thin; this just makes it a little more pliable and easier to work with, and it seals the little air holes from the yeast.
Peanut butter. On both slices. This is important, especially if you want to keep it in the freezer. The peanut butter seals in the jelly and keeps the bread from getting soggy. I used White Chocolate Wonderful peanut butter, because that's my faaaaaaaaavorite.
Next, jelly. Or jam. Or preserves. Or spreadable fruit. Or lemon curd. Or marmalade. Or the filling of your choice. You want to keep it towards the middle, at least half an inch from the sides, so it doesn't squish out the sides when you seal the sandwich. I used strawberry rhubarb jam, since that's what I had in the fridge. (You ain't gonna find that in the freezer section either, boyo.)
Then you seal it. This step gave me a lot of trouble to try and figure out. Wonder Bread makes a sandwich sealer thing that does it for you, but I wasn't going to go out and buy a tool that just does that. That seems like a waste. I read a couple people used pastry cutters that did the same thing, but I didn't have one, and those wasted a good portion of the sandwich itself. In the end, it was simple: just use a fork, like you would for a hand pie. No part of the sandwich gets wasted, and it's something that everyone already has. (And if you don't have a fork, they usually have free plastic ones at Wendy's.) I just used a sharp knife to clean up some of the more raggedy edges and shape it a little better, so it would look less like a deformed ravioli.
And that's all there is to it. Make a bunch, wrap them in plastic, and stick them in the freezer, just like the premade kind. The best part is, you're not stuck with whatever flavors the people at Smuckers think are marketable. I used white chocolate peanut butter and strawberry rhubarb jam on honey wheat bread. You could make an Elvis uncrustable with peanut butter, bacon, and bananas. You could make dessert uncrustables on cinnamon bread with Nutella and strawberry jam. You could even experiment with other types of sandwiches, like ham and cheese. And no matter what you do, it's in that convenient, cute, crust free shape that kids-- and adults!-- love.
And yes, that's my juice box. That I drank right after taking this photo. Because I am a srs adult person.

Thanks to Liz from That Skinny Chick Can Bake for hosting this week's #SundaySupper, and have some fun brown-bagging it with the rest of the #SundaySupper crew:

Sandwiches, Wraps and Entrees:
Munchies, Salads and Sides:
Sweet Treats:

April 6, 2013

Bowties Are Cool Blueberry Goat Cheese Pasta Salad


It's Saturday! You know what that means, kids: It's Doctor Who time!

Yay!!!!!

In case you missed it last week, I'm doing a new weekly series in honor of Doctor Who's 50th anniversary this year.

(Btdubs: Feel free to share your thoughts on last week's episode, The Bells of St. John. It wasn't my favorite episode, but I now totally get why Oswin was such a genius, and why the daleks turned her into one of them (although, I still don't get why the daleks would make other people dalek when they view everything else as inferior. They're not cybermen for crying out loud. They don't do upgrades) Annnnnnd discuss)

This week we're still focusing on the newest Doctor, because if he's only taught us one thing, it's that bowties are cool.
Source
On the interwebs, I read that Matt Smith's costume was originally supposed to be completely different and kind of pirate-y. I also read that Steven Moffat (executive producer and head writer) was completely against the idea of a bowtie, but that Matt wasn't really the Doctor until he donned the tweedy jacket and the bowtie and then started to pretend that his pen was a sonic screwdriver.

Side note: How adorable is Matt Smith? I want to shrink him and keep him in my pocket. Is that weird? I think that might be weird.
Given the inherent coolness of the bowtie, there was no doubt that I would make something with bowtie pasta for this series. My original thought was to do that trick where you dye the pasta by adding food coloring to the boiling water. Just a few drops it said. That's all you'll need, it said. It's so easy, it said.

It lied. Like a rug.

Instead of lovely TARDIS blue bowtie pasta, I had sad little grayish bowtie pasta. Those bowties were NOT cool.

Disheartened, I went to Home Goods for some retail therapy, where among other things, I found elderberry white balsamic vinegar. I was intrigued (and my brother immediately started quoting Monty Python), and grabbed it. Then I was watching Diners, Drive Ins, and Dives, and they made a pie with blueberries, goat cheese, and fresh basil. That flavor combination sounded fabulous, but we all know that I have some issues with pie.

Then suddenly, like an invasion of Sontarans, it struck: Blueberries. Blue, like the TARDIS is blue. With a fruity balsamic vinaigrette. In a pasta salad. A bowtie pasta salad. Which would be cool. Literally. Because it's served chilled.

...

My mommy thinks I'm funny.
Time itself must have bent over backwards to get me to make this salad, because it is officially my favorite salad in the history of ever. I'm not usually not a fan of the sweet/savory combo, and I never like fruit in my salad, but for some reason, this hits all the right notes. The firm pasta, the lightly sweet homemade vinaigrette, the bitterness of the spinach, the tang of the goat cheese, the slight tart of the berries, with the underlying note of the fresh basil. (The tomatoes are really just there for color. I picked them out afterwards. They didn't really go. Hashtag foodbloggerproblems)

Best. Salad. EVER. And also one of the prettiest. :3
Whovian or not, there are three facts that must be universally acknowledged as true:

  1. Bowties are cool.
  2. This salad is awesome.
  3. And this is me almost every time I go to cook something:

Source
"What are you making?" "I don't know. It's a thing in progress. Respect the thing!"

Blueberry Goat Cheese Pasta Salad {Printable Version}
Yield: 6-8 servings

Ingredients
1 box (16 oz.) bowtie pasta
½ cup fruity white balsamic vinegar
½ cup olive oil
2 tsp. spicy brown mustard
2 cloves garlic, minced
½ tsp. sea salt
½ tsp. freshly cracked black pepper
½ tsp. dried oregano
1 pint fresh blueberries
½ cup fresh basil, julienned
4 oz. goat cheese, crumbled
12 oz. fresh baby spinach (or your favorite lettuce)
Optional—cherry tomatoes

Directions
Cook the pasta according to the directions on the box. Drain and rinse well with cold water. While the pasta is cooking, mix together the vinaigrette: in a small mixing bowl, whisk together the balsamic, oil, mustard, garlic, salt, pepper, and oregano until smooth. Refrigerate until use.

Mix the cooked pasta with the blueberries, basil, half of the goat cheese, and about half of the vinaigrette (and cherry tomatoes, if using). To serve, line the bottom of a serving bowl or platter with the spinach, and top with the pasta. Sprinkle the remaining goat cheese on top, and drizzle with the remaining vinaigrette.

Serve cool.

Tip: Salt the boiling water for more flavorful pasta. I usually cook the pasta 1-2 minutes less than the shortest cook time on the box because I prefer it more firm.

Recipe by Kim
It kind of looks like it's crying, doesn't it?
...
OMG, don't blink, it's the weeping pasta salad!!!!!