Showing posts with label whole wheat. Show all posts

January 7, 2015

Cake Batter Muffins


Once upon a time, there was a food blogger who had been invited to a friend's house for brunch. The food blogger didn't want to show up to the brunch empty handed, as she was kinda-sorta a semi-professional amateur of baked goods. But the food blogger happened to not be in much of a mood to bake (or have much in her pantry to bake with). Something simple would be ideal, something easy that didn't take much effort.

The food blogger spotted a jar of Homemade Yellow Cake Mix she had used the week earlier to make Cake Batter Truffles. What could be easier? She'd make cupcakes!

But, the food blogger realized, a cup of the mix was missing for the truffles, and that would throw off the measurements. Plus, she really didn't feel like making frosting. Luckily, this food blogger lived in the era of "cake batter ALL the things" and knew that cake mix could be used for more than just cake. She decided to use the leftover mix as a muffin base instead. She replaced the missing mix with whole wheat flour. She was low on eggs, so she replaced 2 of them with unsweetened applesauce. She became worried that the whole wheat flour and applesauce would make the muffins too dense, so she used buttermilk instead of regular milk. Then she added sprinkles, just for funsies.

These last minute muffins turned out so good that the food blogger resolved to put them on her food blog, but had no time to take photographs of them. It wasn't until many moons later that the food blogger remembered the muffins and whipped them up again, and they were just as good as remembered.
Okay, fairy tales aside, these muffins are in no way, shape, or form healthy. It's pretty much still cake. I tried to healthify them a bit with the whole wheat flour and unsweetened applesauce, and some of the sugar and fat goes away when you remove that cup of mix, but it's not enough to tick the healthy column. These are not New Year's resolution muffins; these are a way to eat cake for breakfast muffins.

Not that I have a problem with cake for breakfast, I'm just putting that out there.

And these are definitely more like cake than muffins. They are soft and moist, but the whole wheat flour gives them a subtle heartiness. They are denser than cake, but not too dense, and they have that great cake batter flavor which is what makes them so darn special.

Plus, they are so dang easy to make. Even making the mix, it took me maybe ten minutes of prep time. If you have the mix premade, it would take no time at all to get to the oven. Easy clean up too, with only one bowl and one whisk to put everything together.

Now, this recipe only works with my homemade yellow cake mix. I don't know how it would translate with a box mix, or another yellow cake mix recipe. My best guess would be to replace the oil with applesauce, the water with buttermilk, and a cup of the mix with whole wheat flour. But again, I haven't tried it, so you shouldn't take that as gospel. (If you try it, let me know!)
Cake Batter Muffins
Yield: 18 muffins

Ingredients
Homemade Yellow Cake Mix (minus 1 cup of mix)
1 cup whole wheat flour
3/4 cup buttermilk
1/2 cup unsweetened applesauce
1 egg
1 tsp. vanilla extract
1/2 tsp. almond extract 
1/2 cup rainbow sprinkles

Directions
Preheat the oven to 375 degrees F. In a large mixing bowl, whisk together the cake mix and whole wheat flour. Mix in the wet ingredients until smooth (some lumps are fine). Fold in the sprinkles.

Line a cupcake tin with paper liners and fill 3/4 of the way with batter. Bake 17-20 minutes, until a toothpick inserted in the center comes out clean. Allow to cool before serving.

Note: you can use the leftover mix to make cake batter truffles

Recipe by Kim

May 21, 2014

Cinnamon Breakfast Squares


You guys know what I need right now? Energy. I think I taped and spackled at least 30 cracks in my walls so far, and I keep finding more. I've only had time to prime one room, and don't even get me started on the sheer amount of cleaning the sellers left me with. Seriously, they were nasty.

So when I got the chance to try the new Cinnamon Crunch Morning Energy flavor of Honey Bunches of Oats, I held out my bowl like I was Oliver Twist. It's been the perfect way to start my mornings. Not too sweet (which I love in a cereal), super cinnamon-y, and I love the little cinnamon clusters. They're my favorite part. Plus lots of protein to keep me going when I'm upside down and backwards spackling a crack in the doorway arch.
I also got a chance to try these Cinnamon Breakfast Squares. These guys smell like French toast when they're baking up, it's fantastic. They didn't come out quite like I had expected, though. I think that I was expecting them to be cake-ier or at least crunchy, but they actually came out a little eggy. They actually reminded me almost of a really thick crepe with a sort of cinnamon streusel on top.

Now, don't get me wrong, they were actually really tasty. Sort of like a crepe-y, French toast-y hybrid, which is better than it sounds. And when it's breakfast, it's okay if it's a little eggy. The recipe recommends topping it with a dollop of Greek yogurt, honey, summer berries, and cinnamon or nutmeg. I liked them best with syrup and a good dusting of cinnamon sugar. And since strawberries are grown locally in my town, that's obviously the way I go when it comes to berries. (I'm not a huge fan of yogurt though, so I skipped it. It's a textural thing. If I'm not legitimately craving it, it makes me gag)
I made these for Mother's Day breakfast, and they were a big hit. My mom loved them, and that's really all that matters.

Cinnamon Breakfast Squares with Yogurt and Berries
Yield: 6 squares

Ingredients
1 cup Honey Bunches of Oats Morning Energy Cinnamon Crunch cereal
1/3 cup whole wheat flour
3 tbsp. sugar
1/2 tsp. ground cinnamon
1/2 tsp. baking powder
1/4 tsp. salt
3 eggs
1/2 cup nonfat (skim) milk
1 tsp. vanilla
1 container (6 oz) Greek yogurt, any flavor
3 cups fresh berries, or fruit of choice
Honey or pancake syrup, for drizzling
Cinnamon or nutmeg, for sprinkling (I used cinnamon sugar)

Directions
Preheat the oven to 425 degrees F. Grease and flour an 8x8" square pan.

In a mixing bowl, mix the cereal, flour, sugar, cinnamon, baking powder, and salt together using a wooden spoon or rubber spatula, lightly crushing the cereal as you stir.

In a separate bowl, whisk the eggs, milk, and vanilla together until well blended. Combine with the dry ingredients.

Pour the batter (it will be thin) into the prepared pan, and bake for 18-20 minutes, or until the bars are set when the middle is lightly pressed. Cool on a wire rack for 10 minutes.

To serve: cut the bars into 6 equal pieces. Top with yogurt, surround with berries. Drizzle with honey or syrup, and dust with cinnamon or nutmeg. Serve immediately.

*Disclaimer: I was provided with free samples of Honey Bunches of Oats Morning Energy so that I could try this recipe. I am under no obligation to give a positive review, nor do I receive any further compensation for this post. All opinions are, as always, my own.*

January 26, 2014

Peanut Butter Chocolate Chip Waffles


I've been in a sort of waffle state of mind lately. I keep thinking about waffles and making them. I keep wondering, "would this be a good flavor combination for a waffle? Would this work if I added it to waffle batter? I wonder if I can put these in the waffle iron."

So when the insomnia monster hit, it was no surprise that I decided to use my not-sleeping time to make waffles.
The only question was what kind? I'd been playing around with the idea of a pizza waffle, but that just seemed too complicated for my no-sleep addled mind. Then the idea came to me: peanut butter. You don't really see peanut butter waffles that often, and it sounded really good to me at the time. I decided to use whole wheat flour to help give it that crispness and heartiness, buttermilk for a good rise, and chocolate chips because, well, duh.
The waffles came out just as I had imagined: crisp, chock-full of peanut butter and chocolate chips. The waffle itself isn't overly sweet, so syrup, powdered sugar, or honey is a must on these puppies. Or you can eat it like I did, with strawberries, extra chocolate chips, and a chocolate peanut butter drizzle (a spoonful of peanut butter and a few chocolate chips melted together in the microwave). I used fruit so that's the healthy way to eat it, right?

Peanut Butter Chocolate Chip Waffles
Yield: 4 waffles

Ingredients
1 cup whole wheat flour
1/4 cup sugar
1/2 tsp. baking soda
1/4 tsp. salt
1 cup buttermilk
1/2 cup creamy peanut butter
1 egg
1/2 tsp. vanilla extract
3/4 cup semisweet chocolate chips

Directions
In a large mixing bowl, whisk together the flour, sugar, baking soda, and salt. In a separate bowl, mix together the buttermilk, peanut butter, egg, and vanilla extract. Add the wet ingredients to the dry and mix until a batter forms (some lumps are fine). Fold in the chocolate chips. Cook in a waffle maker according to the manufacturer's instructions.

Recipe by Kim

January 8, 2014

Poppin' Pebbles Berry Almond Muffins


Cereal is a thing my family eats a lot of. I mean, we stock up on cereal like some survivalists stock up on canned food.

Breakfast? Bowl of cereal. Nothing ready for dinner? Bowl of cereal. Need a snack? Bowl of cereal.

So when I got the opportunity to try new flavors of Pebbles cereal, I jumped on it. I was all, "free cereal? I don't even care what happens to me the rest of the week!"
The two flavors I got to try were Xtreme Cocoa Pebbles and Poppin' Pebbles. The Xtreme Cocoa Pebbles are extra chocolate-y, so that it makes your milk taste like an "xtreme chocolate milkshake." I like chocolate cereal, so I liked this, but it was a little too chocolate-y for me. I actually don't like chocolate milk (I know, I'm weird), so chocolate cereal is a fine line for me. I need something on the less chocolate-y side so it won't add too much chocolate to the milk. Chocolate milk fans should totally run out and buy a box, though. As soon as the milk hit the cereal, it started turning to chocolate. It's not overly sweet, either, which is something I like. I can't eat too sweet for breakfast.

Poppin' Pebbles is a berry-flavored cereal with these big green pieces that fizzle like pop rocks. And because I'm actually 5 years old, I think that's pretty awesome. I literally will sit there with the open box, pick out the fizzle pieces, and sit there with my mouth open so everyone can hear it fizzle. Because I am totally an adult-type person.
The cereal itself has a good berry flavor without tasting too artificial. I will admit, I was afraid that it would be grossly sweet, especially after I opened the box and it smelled like candy. It did end up being a little too sweet for me, personally, as a breakfast cereal, but it is great as a snack. It satisfies my sweet tooth without wrecking any good eating I've been doing that day. I've been eating it by the handful. When I'm not picking out the fizzle pieces.
The berry flavor of the Poppin' Pebbles got me thinking how great they would be paired with something almond. A not-too-sweet almond muffin, in fact. An easy-peasy, eggless almond muffin that only needs two bowls and a whisk to whip up. So easy, even the kiddos can help. Whole wheat flour to add some heartiness, almond butter for protein, applesauce and a handful of frozen berries for fruit, and some Poppin' Pebbles for added flavor and sweetness. They are nutritionally dense muffins, but are still soft, moist, and light, packed with flavor.
I was a little sad that the fizzle pieces kind of fizzled out while baking. I was hoping you'd be able to bite into a muffin and be like, whoa. But c'est la vie. This means you can pick out all the fizzle pieces and sit there with your mouth open so people can hear it.
Poppin' Pebbles Berry Almond Muffins
Yield: 16 muffins

Ingredients
1 cup all-purpose flour
1 cup whole wheat flour
3/4 cup sugar
1/2 tsp. salt
1/2 tsp. baking soda
1 cup buttermilk
1 cup almond butter*
3/4 cup unsweetened applesauce
1/2 tsp. vanilla extract
1/2 tsp. almond extract
1 cup Poppin' Pebbles cereal, plus more for sprinkling
Approx. 1/2 cup your choice of berries (optional). I used a handful of frozen raspberries

Directions
Preheat the oven to 350 degrees F. In a large bowl, whisk together the flours, sugar, salt, and baking soda. In a separate bowl, mix the buttermilk, almond butter, unsweetened applesauce, vanilla and almond extract. Add the wet ingredients to the dry, and stir until well incorporated. Fold in the cereal and berries (if using).

Line a muffin tin with paper liners, and fill 3/4 of the way or more with batter. Sprinkle the tops with more cereal and bake 20-25 minutes, until a toothpick inserted in the center comes out clean. Let cool on wire racks before serving.

*I used an all-natural roasted almond butter, with no added oil, salt, or sugar.

Recipe by Kim

*Disclaimer: I was provided with free samples of Post Poppin' Pebbles and Xtreme Cocoa Pebbles for the purposes of this review. I was under no obligation to give a positive review, and I received no further compensation. All opinions are my own*

November 6, 2013

Chocolate Orange Scones

You know what's weird? Writing a sequel. It's like writing fanfiction, but of your own work. It's been so long since I wrote the original that it feels like it was written by someone else. I have to stop myself from putting a disclaimer at the beginning of each chapter. All recognizable settings and characters belong to their original author. The story and any original characters are my own. I make no money from the writing of this fic.

Which is all true, if you think about it. The settings and characters do belong to their original author (me), and I actually do not make any money from writing it. Because, you know, it's unpublished and everything.

And it's easy, for all the reasons fanfiction is easy-- I'm already intimately familiar with the characters and the world, and I can assume that anyone reading it would be as well, so I can skip over all of those explain-y bits.

And it's hard for all the reasons that fanfiction is hard-- because the characters and world have already been established, I have to stay within those parameters. If I want to show character development, I have to show it in a way that doesn't seem OOC (out of character). If I want to introduce a new element, I have to make sure that it doesn't break some rule that's already been set.

This is one of the things that people don't tell you, but it's yet another reason that I think writing fanfiction is one of the best ways to learn how to write. I still insist that it's how I learned to write.

(Psst, I added a wordcount widget at the top left of the page, so you can track my progress and yell at me if I get behind. As of Tuesday, I was 900 words ahead. Booya.)
You know what else is weird? Apparently, when I have insomnia, I bake scones. These were no exception. At 4:30 in the morning, I decided I would make chocolate orange scones. And I did. Buttery, crumbly, chocolatey scones, not too sweet, with a hint of orange zest. The whole wheat flour makes them nice and hearty, good for a filling breakfast. This is not a dessert for breakfast scone, at all. But it is a tasty, chocolatey breakfast treat.

Chocolate Orange Scones
Yield: 8 scones

Ingredients
1¼ cups all-purpose flour
1 cup whole wheat flour
⅔ cup packed dark brown sugar
½ cup unsweetened cocoa powder
1 tsp. baking soda
1 tsp. salt
¾ cup cold unsalted butter
4-5 tbsp. milk
2 eggs, lightly beaten
1 tsp. orange zest
½ tsp. vanilla extract

For the topping:
1 tbsp. milk
2 tbsp. raw sugar
¼ tsp. orange zest

Directions
Preheat the oven to 375°F. In a large mixing bowl, mix the flours, sugar, cocoa powder, baking soda, and salt. Cut in the cold butter using a pastry cutter or rubbing it in with your fingertips, until the mixture resembles coarse crumbs. Stir in 4 tbsp. milk, eggs, orange zest, and vanilla with a wooden spoon until the dough comes together. If the dough seems too dry, add the extra tbsp. milk.

Turn the dough out onto a lightly floured surface and knead gently about 10 times. On a cookie sheet lined with parchment paper or a silpat mat, shape the dough into a flat, 8 inch round. With a sharp knife dipped in flour, cut the round into 8 wedges, but do not separate. Brush the tops with 1 tbsp. milk. Mix together the raw sugar and orange zest, and sprinkle that evenly on top.

Bake for 18-20 minutes, until the edges are set and the middle is slightly soft.  Remove the scones from the cookie sheet and place on a wire cooling rack, carefully separating them. Best served warm.

Recipe by Kim

September 22, 2013

Apple Spice Waffles #SundaySupper


Today's #SundaySupper is all about fall foods.

We've already established the fact that I'm not the hugest fan of pumpkin, but I love the warm spices prevalent at this time of year; the cinnamon, the nutmeg, the ginger and all spice. And I love love love apples. Especially the fresh picked ones, yum.

I don't cook with apples too often since I'm generally too lazy to chop them, and I don't like when they get mushy, as often happens with cooked apples. But I love appley baked things like apple muffins and apple cake.

And these waffles, they totally taste like apple cake. But better since they're ready in 10 minutes and you can eat them for breakfast.

Since I don't make waffles that often, I started with a reliable base recipe, from you know where. Then I subbed in some whole wheat flour, added about a cup of diced apples, some brown sugar, some apple pie spice, and I replaced the oil with browned butter.

Oh yeah, they're as good as that ingredient list suggests. A totally decadent, season appropriate breakfast treat.
Apple Spice Waffles
Yield: 8 waffles*

Ingredients
1 cup all-purpose flour
1 cup whole wheat flour
1 tsp. apple pie spice
1 tsp. baking powder
1 tsp. baking soda
1/2 tsp. salt
2 cups buttermilk
2 eggs
1/3 cup packed brown sugar
1/3 cup browned butter
1/2 tsp. vanilla extract
1 cup diced apples

Directions
In a large mixing bowl, whisk together the flours, spice, baking powder, baking soda, and salt. In a separate bowl, mix the buttermilk, eggs, sugar, browned butter, and vanilla extract until smooth. Add the wet ingredients to the dry and mix until a batter forms (some lumps are fine). Fold in the diced apples. Cook in a waffle maker according to the manufacturer's instructions.

*My waffle maker is on the small side; if you have a larger waffle maker, you might get closer to 6 waffles

Recipe adapted from The Good Housekeeping Illustrated Cookbook


Celebrate fall with the rest of the #SundaySupper crew:

Amazing Breakfasts, Brunches, and Breads
Outstanding Soups, Starters and Sides:
Comforting Main Dishes:
Decadent Desserts:
Tasty Drinks:

August 18, 2013

Homemade Uncrustables- For the Lunchbox #SundaySupper


Can I just ask you all something? Does anyone actually like to eat the bread crust?

Kids are allowed to not like the crusts. And if they refuse to eat the bread crust, we make it easy on them. We cut off their crusts for them, maybe use a special cutter to make it a cute shape, even buy pre-made, frozen peanut butter and jelly sandwiches just because they don't come with crusts. I honestly don't know of any other food that parents will so willingly discard a part of. And I think it's because everybody secretly agrees: crusts are icky.

But as adults, we feel like it's childish not to eat the crusts. It's a waste of our hard earned money, and we should be thankful that we have icky crusts to eat. And we can't buy those frozen crust free sandwiches for ourselves because they're too expensive, and we should really be eating something with better nutrition, and blah blah blah, pbbbbft.

Double standard much?

Look, I'm a sort of adult-type person. I have a full time job (pbbft), I own a car, I do my taxes. And I'm here telling you that if you want to bring an Uncrustable and a juice box with you for lunch, then by golly you should. No need to feel any sort of adult guilt, because I can show you how to make them cheaper, better tasting, and better for you than the ones you find in the store.

And, you know, you can make them for your child-type peoples too. But only if they're nice and share their candy.
I love Uncrustables, I really really do. I mean, we all know how much I love peanut butter, so it shouldn't surprise you that I love a good pb&j. And I hate the crusts. I force myself to eat them-- unless I'm sitting outside, and no one else is around, and I can throw them for the birds to eat-- but I still hate them. I used to buy Uncrustables in school when I was renting an attic and had no kitchen. I'd just grab one, stick it in my bag, and I'd have something quick and ready to eat on those marathon days when I had class for 7 hours straight with no break. I am not knocking the Uncrustables.

But, as with most things, a peanut butter and jelly sandwich is much cheaper to make on your own, and as a pre-packaged food, Uncrustables have that mile-long list of unpronounceable ingredients. (Plus, they contain malted barley flour, which I can no longer eat since I've discovered it gives me terrible headaches. So they're just big meany-pants) But it's also true that you can't beat the convenience of that ready-to-go sandwich sitting pretty in the freezer, all sealed up and ready to go.

Well if you can't beat them, make them yourself!

... You know what I meant.
You're gonna start with two slices of bread. You can use any kind you like: white bread, potato bread, multi-grain, whole wheat. I used my honey wheat sandwich bread (which is why my slices are a little squat: I baked it in a loaf pan that was a little too big)(Yes, I totally used fresh baked bread to make an Uncrustable. You ain't gonna find that in the freezer section.)
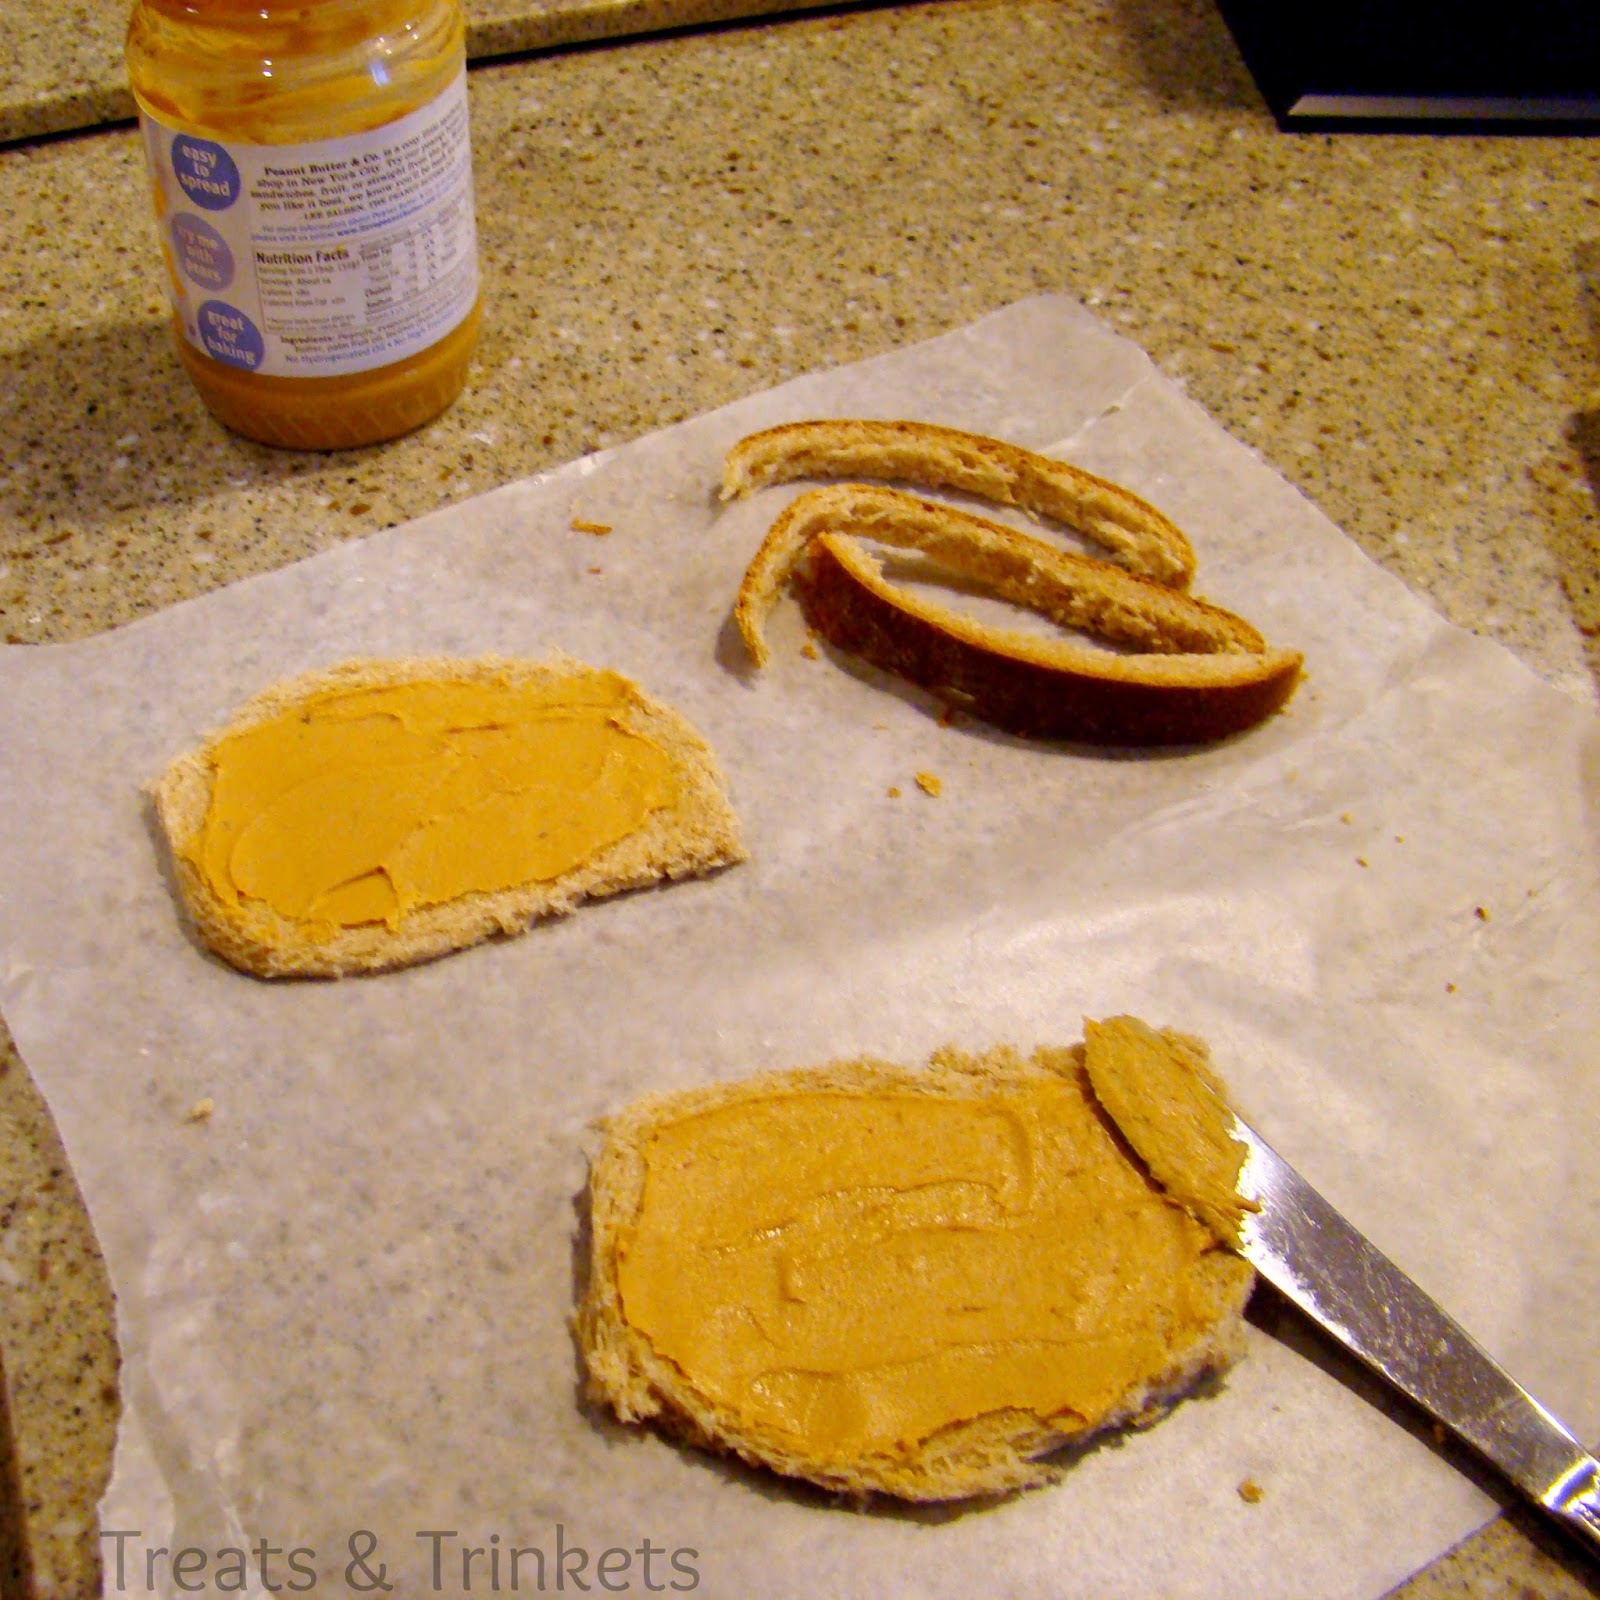
We start by cutting off the crusts. You're not going to want to forget this step, since it's kind of the entire point to this whole exercise. I cut as close to the crust as I could manage so there's less waste. You could save the crusts to make bread crumbs or something. Probably. Or feed them to the dog. That works too.
Next, roll out the bread with a rolling pin. You don't need to roll it out too thin; this just makes it a little more pliable and easier to work with, and it seals the little air holes from the yeast.
Peanut butter. On both slices. This is important, especially if you want to keep it in the freezer. The peanut butter seals in the jelly and keeps the bread from getting soggy. I used White Chocolate Wonderful peanut butter, because that's my faaaaaaaaavorite.
Next, jelly. Or jam. Or preserves. Or spreadable fruit. Or lemon curd. Or marmalade. Or the filling of your choice. You want to keep it towards the middle, at least half an inch from the sides, so it doesn't squish out the sides when you seal the sandwich. I used strawberry rhubarb jam, since that's what I had in the fridge. (You ain't gonna find that in the freezer section either, boyo.)
Then you seal it. This step gave me a lot of trouble to try and figure out. Wonder Bread makes a sandwich sealer thing that does it for you, but I wasn't going to go out and buy a tool that just does that. That seems like a waste. I read a couple people used pastry cutters that did the same thing, but I didn't have one, and those wasted a good portion of the sandwich itself. In the end, it was simple: just use a fork, like you would for a hand pie. No part of the sandwich gets wasted, and it's something that everyone already has. (And if you don't have a fork, they usually have free plastic ones at Wendy's.) I just used a sharp knife to clean up some of the more raggedy edges and shape it a little better, so it would look less like a deformed ravioli.
And that's all there is to it. Make a bunch, wrap them in plastic, and stick them in the freezer, just like the premade kind. The best part is, you're not stuck with whatever flavors the people at Smuckers think are marketable. I used white chocolate peanut butter and strawberry rhubarb jam on honey wheat bread. You could make an Elvis uncrustable with peanut butter, bacon, and bananas. You could make dessert uncrustables on cinnamon bread with Nutella and strawberry jam. You could even experiment with other types of sandwiches, like ham and cheese. And no matter what you do, it's in that convenient, cute, crust free shape that kids-- and adults!-- love.
And yes, that's my juice box. That I drank right after taking this photo. Because I am a srs adult person.

Thanks to Liz from That Skinny Chick Can Bake for hosting this week's #SundaySupper, and have some fun brown-bagging it with the rest of the #SundaySupper crew:

Sandwiches, Wraps and Entrees:
Munchies, Salads and Sides:
Sweet Treats:

August 14, 2013

Honey Wheat Sandwich Bread


26 seconds.

I have been given 26 seconds of new Sherlock footage.

The Internet has been given 26 seconds of new Sherlock footage.

And the fandom has exploded.

(FANDOM (n.)- the fan community of a thing)

You know, I've been a part of a lot of fandoms in my time. I started with Buffy/Angel. That was my gateway fandom (my gateway to geekdom, too). Then there was Lord of the Rings, various animes, Harry Potter, Stargate. I dabbled a bit in the Anne Rice/Vampire Chronicles fandom. I was big into the Mercedes Lackey/Heralds of Valdemar fandom in the early days of fanfiction.net, before Tumblr or Pinterest existed, when it was a lot harder to be part of a fandom [HIPSTER GLASSES]. So I'm a little bit of a fandom expert. And let me tell you one thing: there has never been a fandom quite like the Sherlock fandom.
I couldn't say what it is that makes us unique. 3 episode seasons and an excessively long hiatus (a year and a half and counting...) are 2 of the culprits, for sure, but most other fandoms tend to go "dark" with no new content. But we watch. We rewatch. We voluntarily give ourselves Reichenfeels (n.- feels created by watching The Reichenbach Fall)(FEELS (n.)- the unwanted feelings inspired by fictional events. Example: I can't handle all my feels watching Bambi's mom die) in order to search for clues, anything we might have missed. We make note of the buttons on Mrs. Hudson's sleeve, of the earpiece in Watson's ear, of the tiniest of Sherlock's expressions during the epic showdown with Moriarty. We refer back to the canon (n.- the official, or original, storyline)-- the books-- to see if we can find some hint to what might happen next. We curse Moffat and Gatiss, and we study interviews with the actors to see if there's anything they might have let slip.
 
"And how many times have you watched the Series 3 promo?" "Oh, it's all a bit of a blur, Detective Inspector. I lost count." (30 geek points if you get that reference)

And then a 26 second promo is released. I watched it about 5 times in a row, not gonna lie. But I'm still not as bad as others who have scrutinized and analyzed every frame. Gif sets have been made. Theories have been adapted. New theories have been created. Watson's mustache has been named Harold, and Lestrade's hair has been mourned. The Sherlock fandom is one of the craziest and most obsessive that I've ever been a part of, and it's fantastic.
So with the new promo awakening some of my Reichenfeels (damn you Martin Freeman and your ability to break my heart into bitty pieces), I needed to do some carbo loading. I also needed some sandwich bread for another recipe, and since we don't really eat slice bread, it seemed a waste to go out and buy it when I had all the ingredients to make it already in my kitchen. It was fate.

I made a whole wheat bread recipe from Old Reliable, but I decided to make it honey wheat instead. The bread itself is perfect sandwich bread: sturdy, but soft, and the honey gives it a nice, subtle sweetness. There's a nice heartiness from the wheat flour, but it's balanced out by the all-purpose flour. The crust did get a little over-browned-- not burnt, but just a little too dark-- so I would suggest tenting it with foil the last 10 minutes or so. This recipe makes 2 loaves, so if you're not a big sandwich-bread-eater like me, you can freeze half the dough, then have fresh baked bread whenever the whim takes you. I double-wrapped it in plastic, then put it in a zip-top freezer bag, because I'm paranoid about freezer burn.
True story, I was making myself some chicken salad for lunch while the bread was cooling. It was on a rack right in front of my face, and I'm cracking some pepper over the chicken thinking, hmm, I wonder what we have that I can eat this on. And then I looked at the bread, and I thought, hmm, I wonder how I should style it for the pictures. And it took me about another 5 minutes to put those two things together, I'm not even kidding right now. I blame Sherlock.

Honey Wheat Sandwich Bread
Yield: 2 loaves

Ingredients
4 cups whole wheat flour
3- 3½ cups all-purpose flour
3 tbsp. sugar
4 tsp. salt
2 packages active dry yeast
2¼ cups milk
⅓ cup honey
⅓ cup unsalted butter or margarine

Directions
In a large mixing bowl, or the bowl of a stand mixer, mix together the sugar, salt, yeast, 2 cups whole wheat flour, and 1 cup all-purpose flour. In a saucepan over low heat, heat the milk, honey, and butter until warm, approximately 110-120 degrees F (the butter doesn't have to melt completely). With the mixer on low speed, slowly add the wet ingredients to the dry. Increase the speed to medium and beat about 2 minutes, scraping down the sides of the bowl as necessary. Add another half cup of whole wheat flour, and half cup of all-purpose flour. Beat another 2 minutes on medium speed.

Fold in 1 and a half cups each of whole wheat flour and all-purpose flour to form a soft dough. If the dough is too sticky, add the extra 1/2 cup of all-purpose flour. Using the dough hook, mix on low speed (or knead by hand on a lightly floured surface) about 10 minutes, until the dough is smooth and elastic. Shape the dough into a ball and place in a lightly oiled bowl, turning to coat completely. Cover and let rise until doubled, about 1-2 hours.

Punch down the dough, turn it out onto a lightly floured, and cut in half. Cover and let rest about 15 minutes. Working with one half at a time, roll the dough into a 12 x 8 inch rectangle. Starting at the short side roll the dough up as tightly as possible and pinch the dough to seal. Seal the ends by pinching them down and folding them under. Place in a regular loaf pan that's been lightly greased and lined with parchment paper. Repeat with remaining dough. Cover and let rise until doubled, about 1 hour.

Preheat the oven to 400 degrees F. Bake about 25-35 minutes, until the tops are well-browned and the loaf sounds hollow when tapped. If the crust is browning too quickly, tent with foil after the first 15 minutes. Remove from the pan and let cool on a wire rack.

Note: If you only want to make one loaf, freeze half the dough. After letting it rest, wrap in plastic wrap, then place in a freezer bag. To use, defrost completely in the refrigerator, then shape and let rise as directed before baking.

Recipe adapted from The Good Housekeeping Illustrated Cookbook