October 31, 2014

Frankenstein's Monster Cupcakes


Do you guys realize that every year I've had this blog, I've done a classic horror movie monster cupcake for Halloween? Last year, I did zombie cupcakes. The year before that, I did vampire fang cupcakes. The year before that, I didn't have a blog.

This year, I knew I wanted to keep that ball rolling, so I asked a friend what monster cupcakes I should make this year. Her answer was immediate: Frankenstein.
But Frankenstein cupcakes had been done to death, and by better decorators than I. Or so I thought. Every Frankenstein cupcake I came across was abso-freakin-lutely stinkin' adorable. Don't get me wrong, I love the cute, but at Halloween, I want something a little more gruesome.

So I sat down to brainstorm. How did I do Frankenstein cupcakes that were a) a little more gruesome, and b) accessible to my general lack of decorating skills?
I went back to the monster's origins. Dead flesh stitched back together and reanimated with the use of lightning and mad science. If the monster was flesh that had been stitched together, I could take green Airheads and "stitch" them together over a cupcake. And the frosting should be red, and I could add some red dessert sauce (I used the syrupy part of cherry pie filling) to make the gaps in the "flesh" look all raw and bloody.

Yes, these are words I used to talk about cupcakes.
I had originally intended to use shoe string licorice to stitch the Airheads together, but I couldn't find any, and I didn't really want to order it online. I ended up using a tube of black gel icing from the grocery store. Cookie icing, or a small batch of royal icing would probably work better, since gel can sometimes run.

The Airheads actually ended up being a little more difficult to deal with than I thought. While they were beautifully pliable after being microwaved for a couple of seconds, they harden back up very quickly. Luckily, I wanted raggedy edges and unevenness, so it ended up working out for me, but that's something to keep in mind. And the cherry pie filling can cause the Airheads to "melt," so either add them right before serving, or skip the pie filling "blood." (You can even skip the gaps in the "skin;" it didn't end up having quite the effect I envisioned)
I also decided to buy a nuts and bolts chocolate mold so I could make the monster's iconic neck bolts. I just melted some Merckens black chocolate wafers with some Merckens super white (Merckens black is really more of a very dark brown-- Wilton's gives you a truer black but Merckens tastes so much better), and dry brushed on some silver luster dust, which made them actually look super realistic. Then I just added a touch of red gel icing around the edge for that added touch of gore. I wanted it to look like the bolts had been jammed right in.

But the decorations don't stop at the top:
I colored the cupcakes green and filled the with more cherry pie filling for added oozey gore when you bite into them.

These cupcakes were a bit time consuming, but easy enough for the novice decorator, I think. Except for the chocolate mold and luster dust, there's not a single thing I used that isn't easy to find, most of which can even be found at the grocery store. The cupcakes can be baked, filled, and frosted ahead of time, too.

Cupcakes: I used my Birthday Cake Cupcakes, but Almond cupcakes would go really well with the cherry pie filling
Frosting: I used the same recipe from my Zombie Cupcakes, just added a little raspberry extract (because I thought it would go with the cherry and the watermelon Airheads) and a little whipping cream.
Filling/Blood sauce: Canned cherry pie filling
Skin: Watermelon Airheads. I liked the color of the watermelon better, but Green Apple would also work
Stitches: Black gel icing (royal icing might work better)
Bolts: Black and super white Merckens wafers, melted and poured into this nuts and bolts chocolate mold, and brushed with silver luster dust
*Disclaimer: This post includes affiliate links*

October 23, 2014

Recipes for Little Helpers Round Up


I've always figured that the kid friendliest recipes would be the ones that little hands could help out with. Kids can learn good kitchen etiquette, they get a sense of accomplishment from actually making the food they're going to eat, and Mom or Dad gets some help in the kitchen. Plus, food is fun, so everybody wins. So if you've got a little helper, I've done a round up of some of my recipes that fit this description: easy prep (and easy clean up), minimal use of sharp implements of doom, no mixer necessary, and many of them (with a few exceptions) are even safe for the littlest hands that have trouble staying out of their mouths. (I also had a little too much fun with the new "Comic Book Theme" on Picmonkey. :D)

Obviously, parents are the best judges of what their kids can help with, that should go without saying. I'm just trying to be helpful.

Breakfast

Gluten and egg free, can be made dairy free with the substitution of vegan chocolate hazelnut spread. Little ones can mash the bananas and mix the up the batter.


Dairy, gluten, and refined sugar free, this can be mixed right in the mug it's cooked in, and kids can watch it rise in the microwave. (Note: the mug can be very hot right out of the microwave)


One bowl, egg free muffins that include kid-friendly cereal


Peanut butter, banana, oats, and applesauce make them good for breakfast. Sugar makes them cookies. (Gluten and dairy free)


A homemade graham cracker crust is filled with canned peaches (peach pie filling also works) and topped with crisp mix (Egg free)

Lunch and Dinner

Great for a quick meal or a snack when making a whole pot of pasta isn't feasible. Older kids can learn to do this by themselves, and it's way better than Easy Mac. (Note: the bowl will be very hot straight out of the microwave.)


Kids can mix up this 5 ingredient meatloaf with their hands (always a fun time), and then shape it for the muffin tins


It's pizza and a waffle all in one. Pancake mix makes the batter a breeze to put together, and using the waffle iron means it cooks fast. It's a meal in itself or a fun alternative to breadsticks. (Egg free)


I loved Uncrustables as a kid, and it never occurred to me that I could make my own. Kids can make their own flavor combinations, and use pastry cutters to cut them into fun shapes. Plus, they can be adapted for different dietary needs (gluten free bread, nut free butter, etc.)

Dessert
Peanut Butter Blondies

If kids are willing to sacrifice their Halloween candy, they can help make these blondies. The batter takes a little extra arm strength to whip up, but they can handle it.


I have a friend who makes this chocolate cake with her toddler's help (she even subs in grated zucchini for some of the oil), and uses the opportunity to talk about science (baking soda plus vinegar equals SCIENCE) and shapes. My addition was to use toasted marshmallows instead of frosting. (Egg and dairy free, vegan without the marshmallows)


I got this recipe originally from my middle school home ec class. Melted butter and instant pudding mix make these brownies super simple, and my public school curriculum agrees this is a good recipe for kids to make.


This barely counts as a recipe, and even the littlest can get involved by adding sprinkles or chopped nuts before they go in the freezer. (Gluten and egg free, use dairy free chocolate hazelnut spread for vegan)


The hardest part is shredding the zucchini. Bonus, it's a good way to sneak in some veggies (vegan)

October 16, 2014

EXTERMINATE!: DIY Dalek Cosplay


Hey guys! Guess who wins the "best sister ever" award, alongside the "best wedding present ever" award, and is eligible for the "best nerd-themed joint bachelor/bachelorette party ever" award?

That's right, this girl.

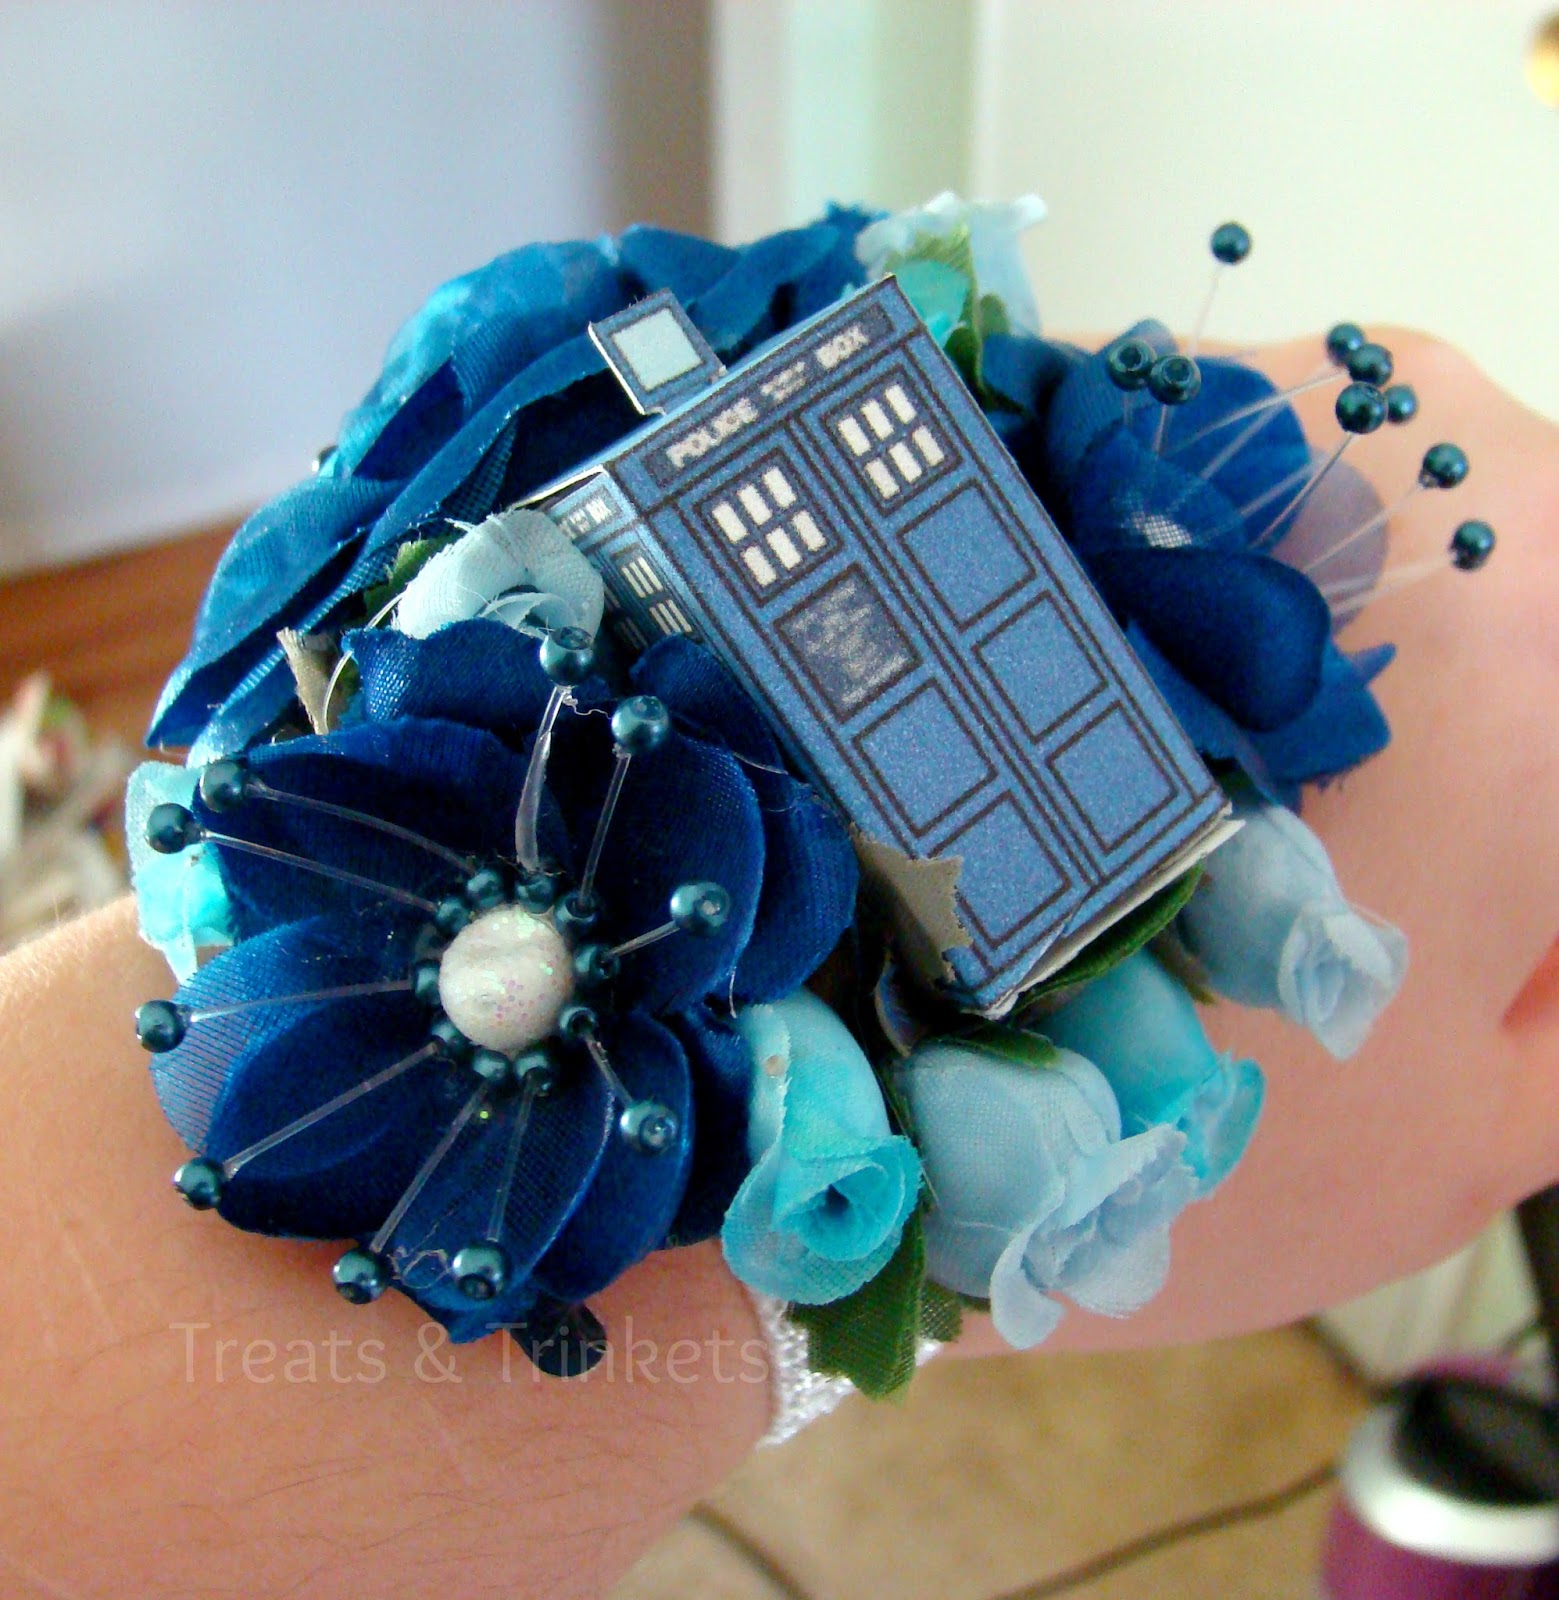
For those of you just joining us, my brother got married this weekend. That's right, the same weekend as New York Comic Con. The biggest nerd event on the East Coast. In an attempt to still go, I asked my now sister-in-law if she would like to have a Comic Con bachelorette party. Her answer, of course, was yes (and then we let my brother come along, so it became a bachelor/ette) party. We pulled out all the stops: a limo into the city, a group Doctor Who cosplay, I made TARDIS corsages for the entire party...
The maid of honor was like, "Kim, I didn't know you could do this!"
I told her I didn't know I could do it either.
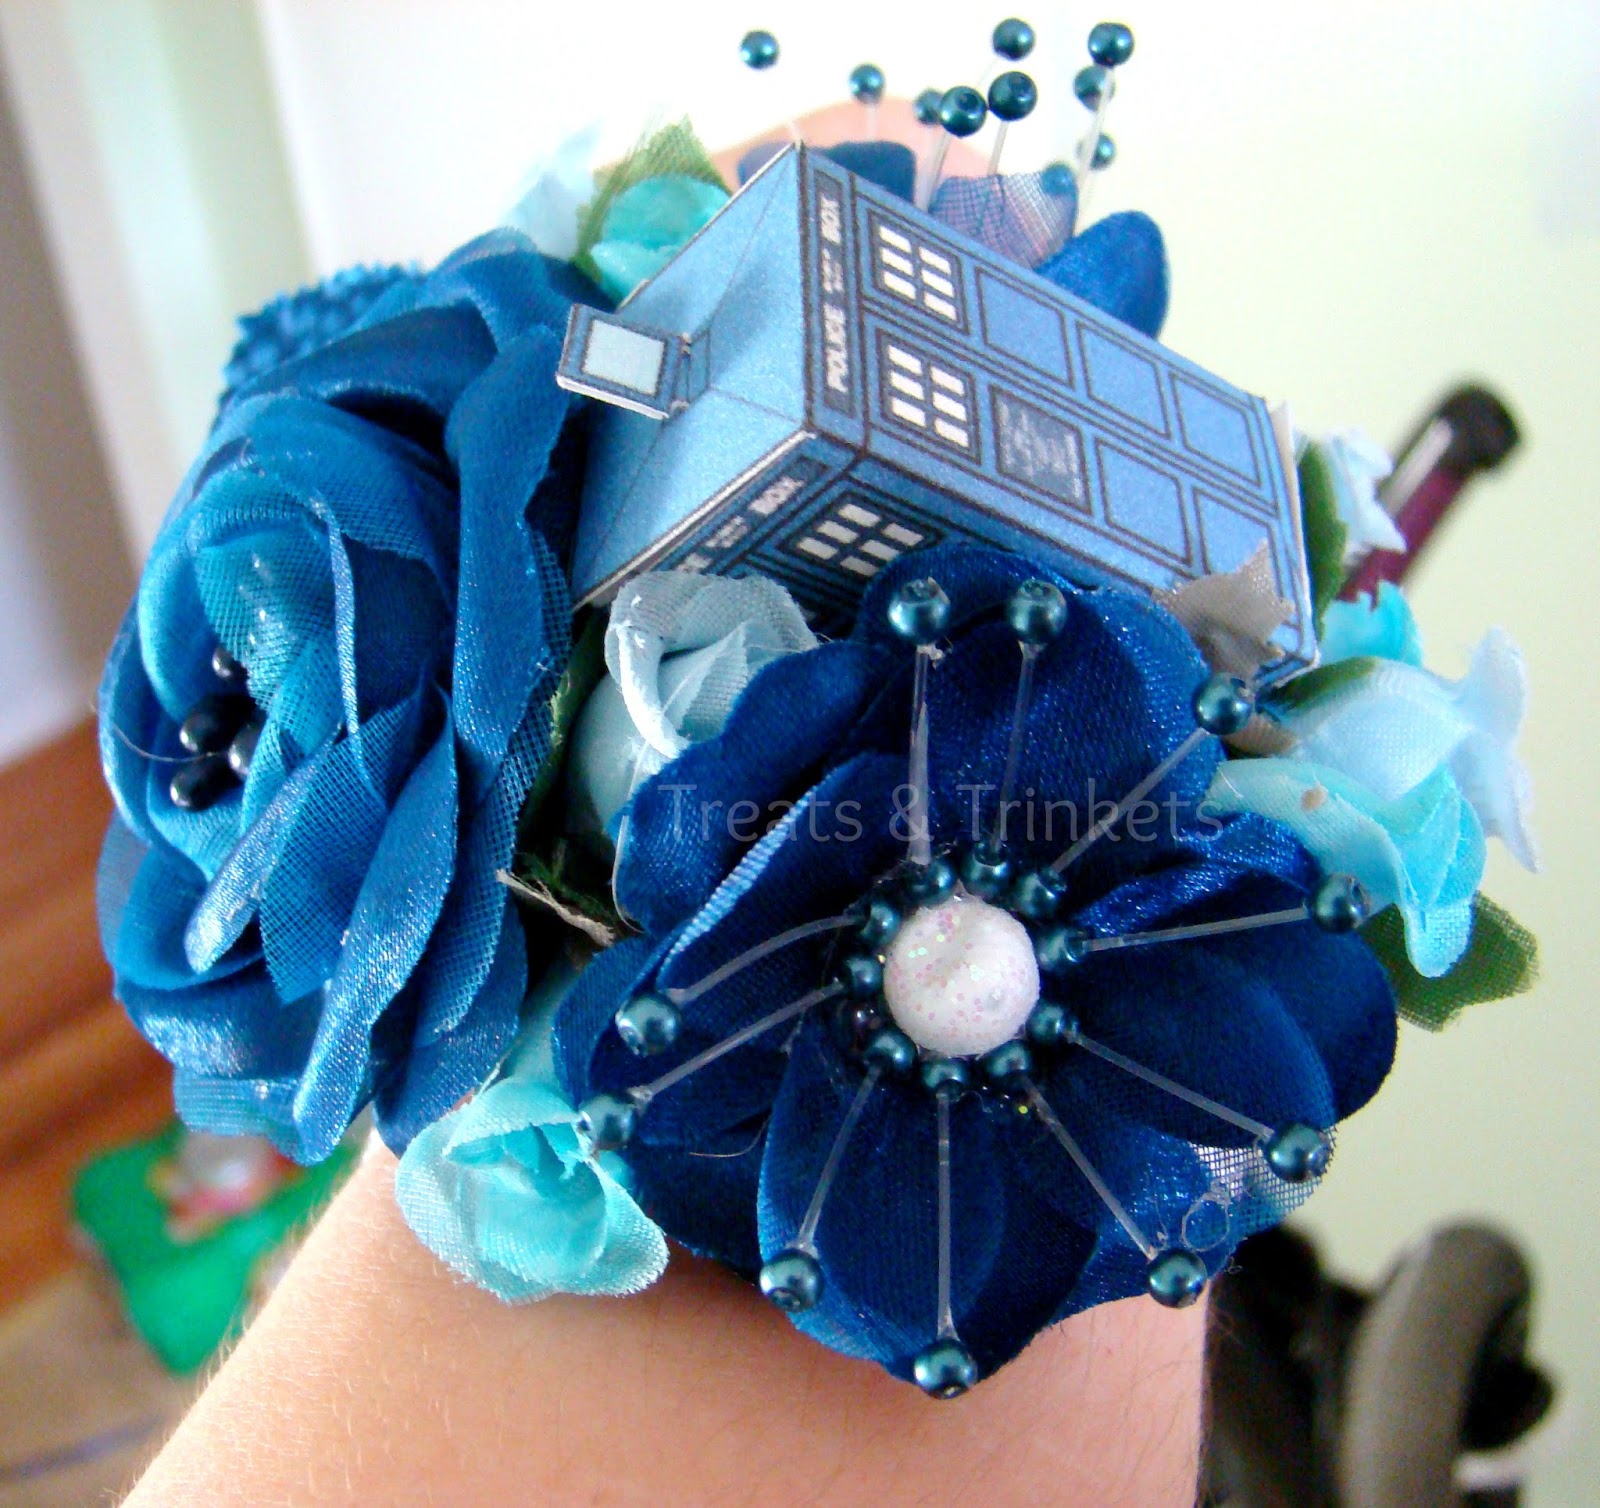
And a boutonniere for my brother
...out of dollar store flowers and mini papercraft TARDISes (I got them here, just resized them to make them a little bit bigger), and I even bought photo ops and we did autographing, even though that's not what I usually do at Comic Con, I wanted to make sure they had the true con experience.

(Fun fact: when I walked up to Brent Spiner to ask for his autograph, he asked if he could take my picture. Freaking Commander Data asked for my picture! That really actually happened and I have witnesses. I think I may be doing autographing more now.)

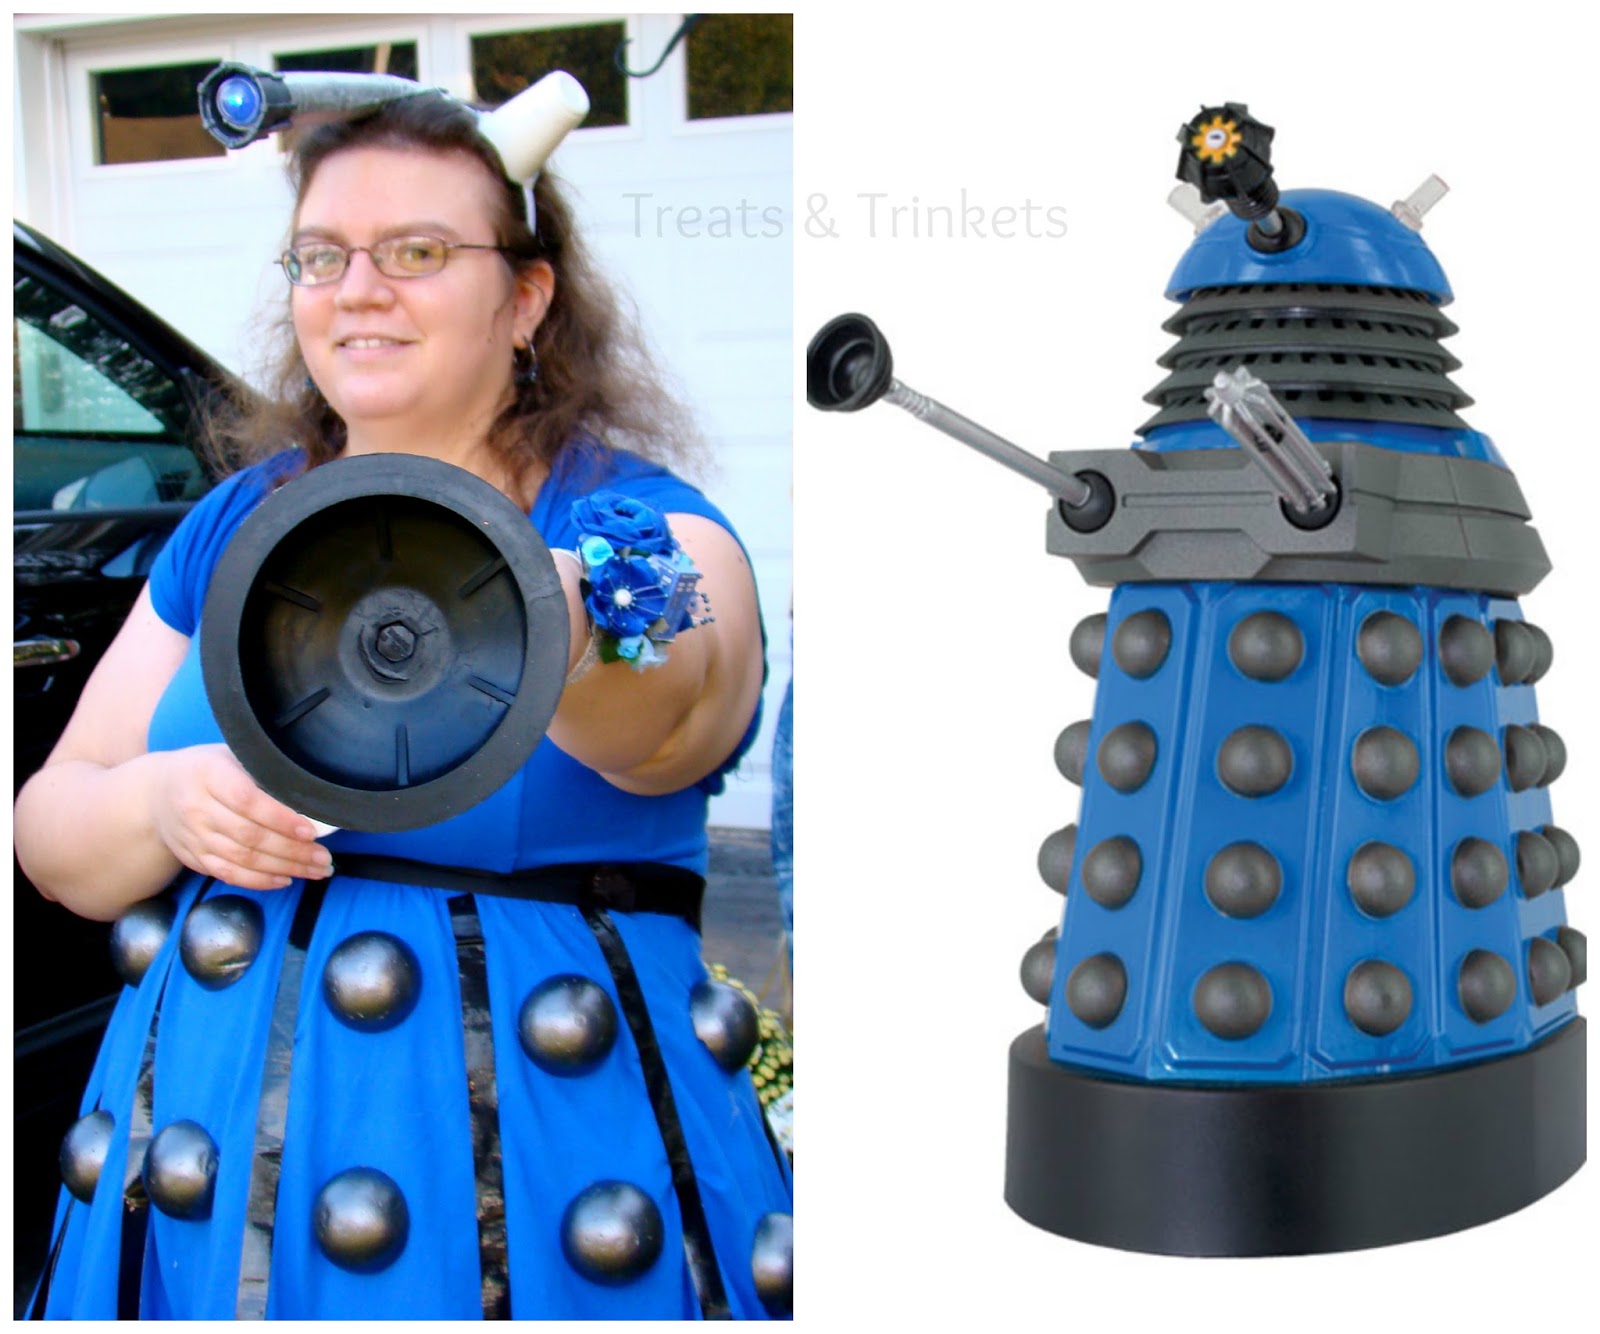
The bride insisted that I be a dalek for our group cosplay (so I was unable to just reuse my TARDIS Dress and Top Hat from last year. Le sigh), and you guys know me. Instead of just buying a dalek dress from Her Universe, I had to go and craft it up.

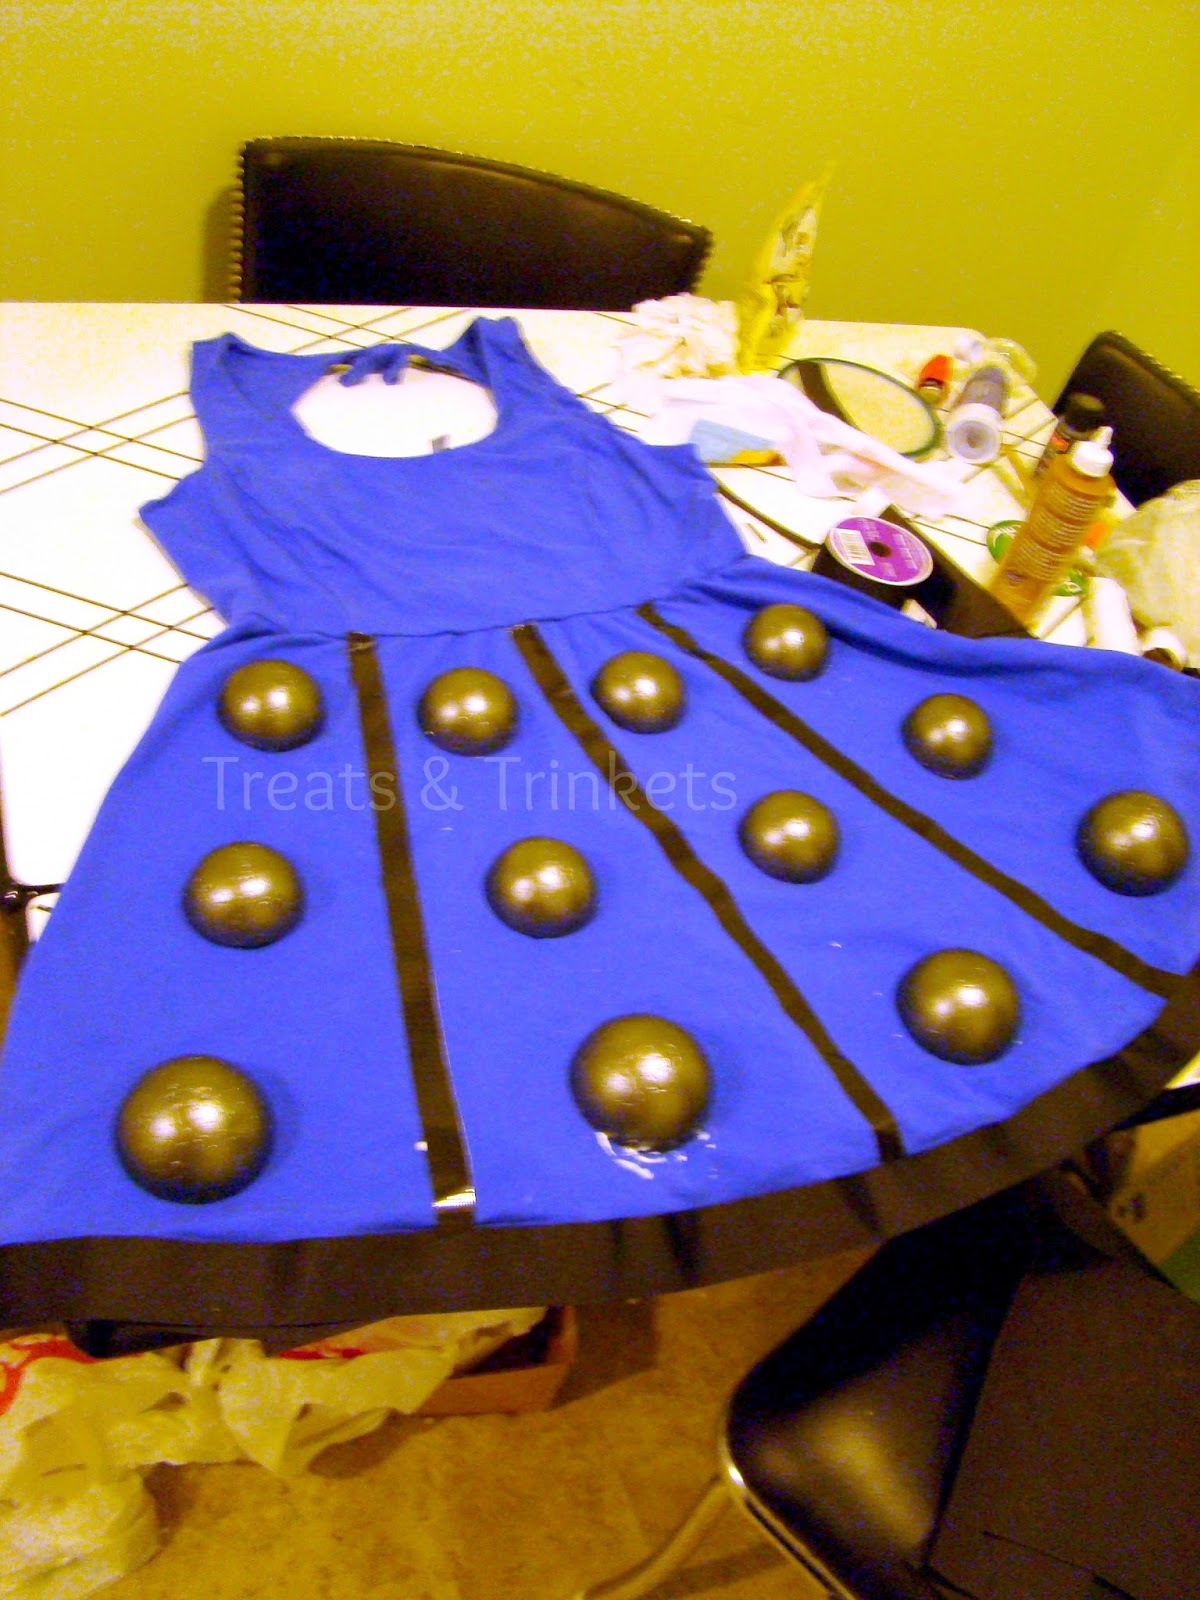
To start with, you want an a-line style dress in any color. I just happened to already have a blue skater style dress that had been one of the TARDIS dress contenders last year that I couldn't return since it had been on sale. I paid about $17 for it originally, I think. I also bought a petticoat skirt to wear under the dress, a cheap costume-y one, to give it a little more fullness. That's optional, but I think it helps make it look a little more dalek-y.

As always, cotton or cotton blends are best for a dress you plan on modding, and always wash clothes first since they are treated with stain resists that will also resist glue and fabric paint
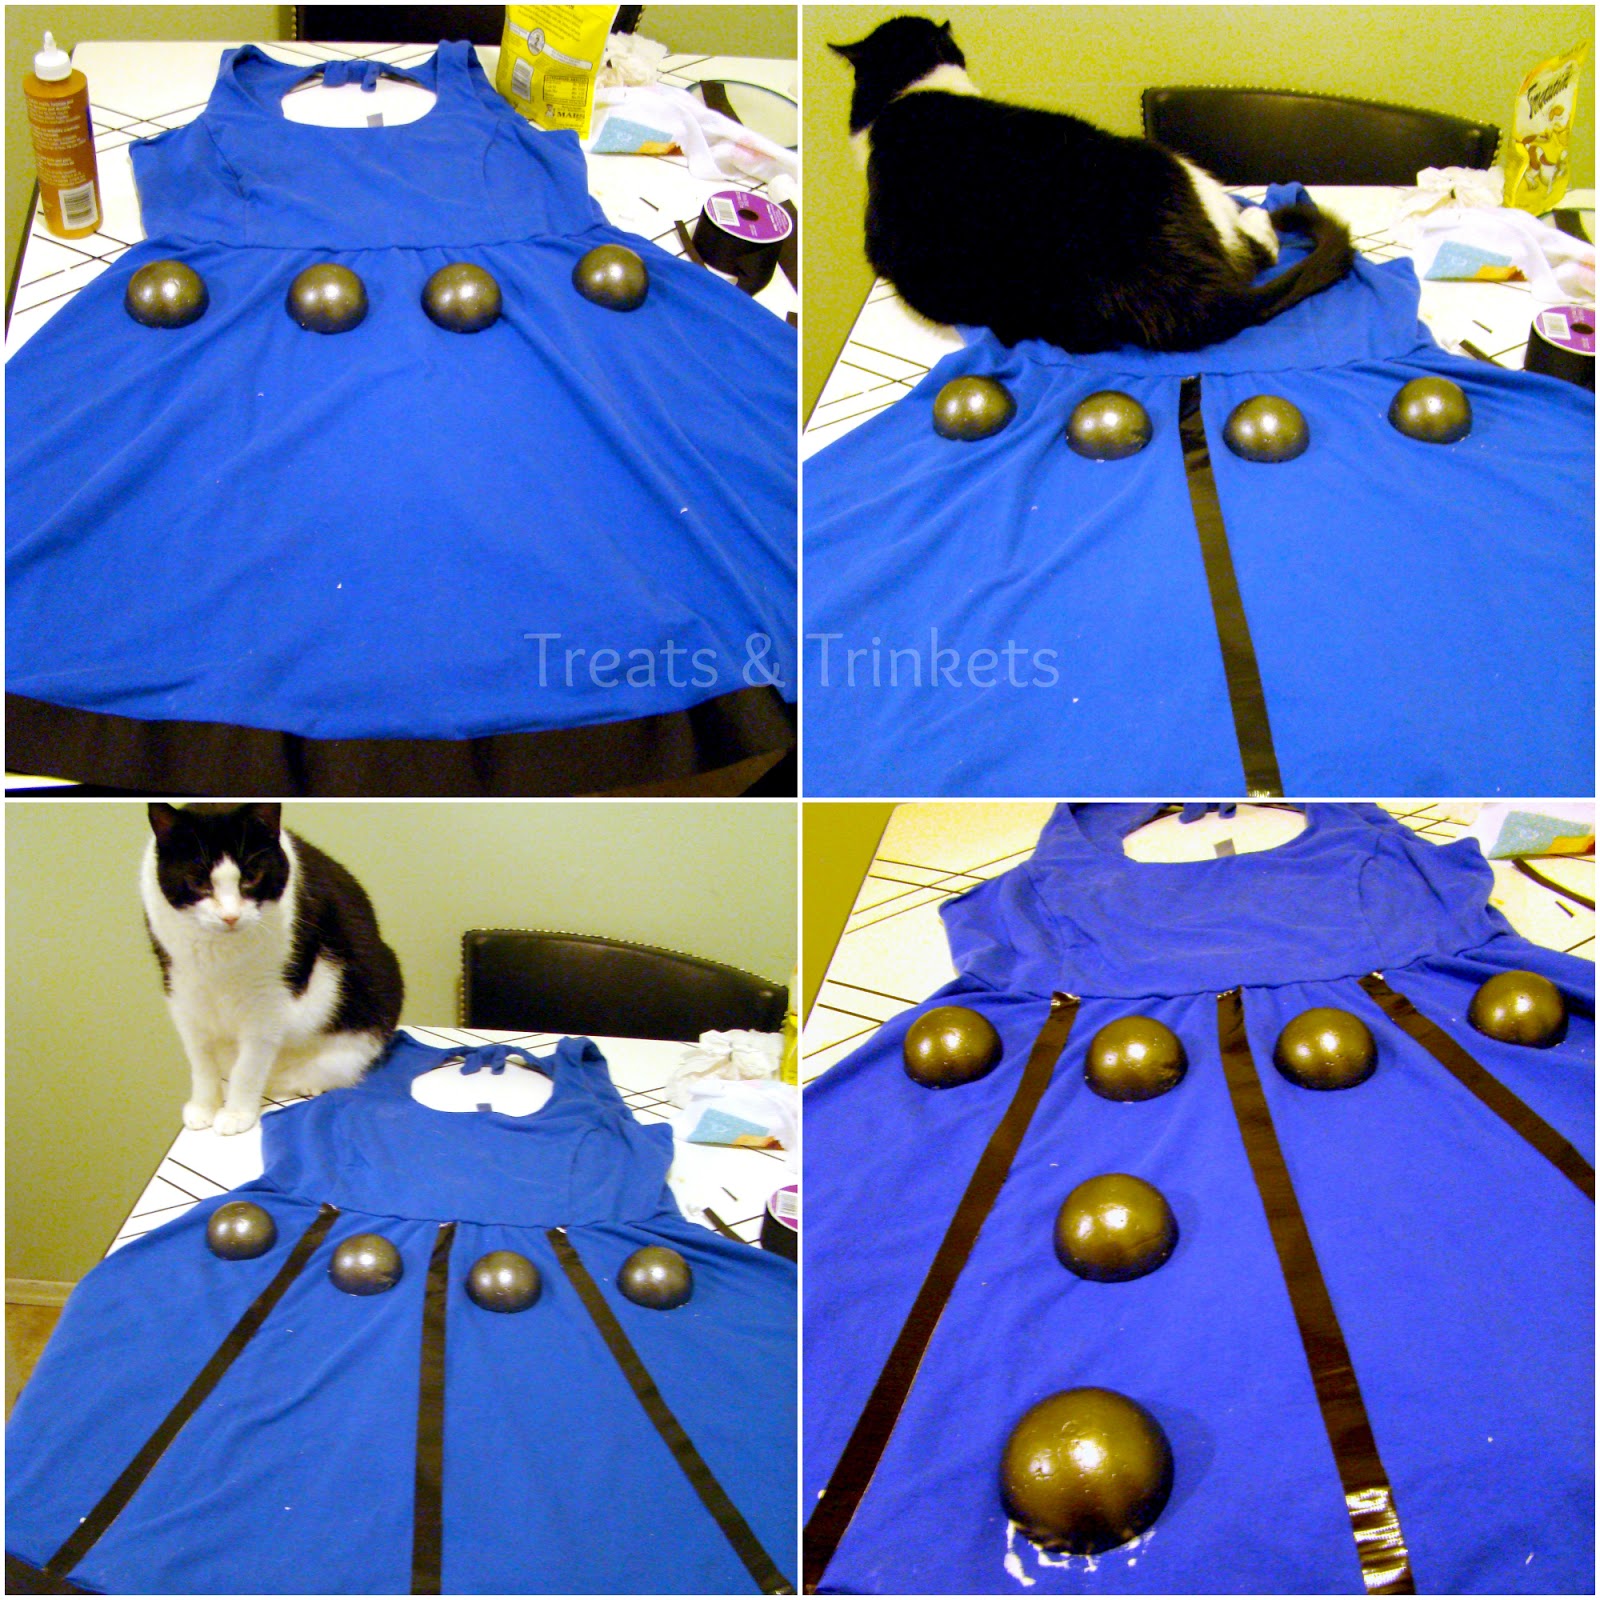
The next thing you want to do is hunt down some craft foam balls, mine were about 3 inches in diameter, but smaller works too. I found them at the dollar store, two to a pack for a dollar. (In contrast, the ones at Michaels around the same size were 6 to a package for $6, so double the price). I bought out their entire supply since there weren't a whole lot left, and you never know if you'll be able to find something again at the dollar store, so I didn't want to chance coming up short. The cashier looked at me funny. The amount you'll need depends on the length of your dress, but I think I used around 15 (30 halves).

Measure the foam balls against the dress to determine the approximate number you'll need (I figured out the minimum and maximum I'd need, so I knew the actual number would fall somewhere in the middle), then using a large, sharp knife, cut the balls in half. (I may or may not have used my big chef's knife to do this. WHAT. My utility knife was too short) The foam balls I used had a seam around the middle, so I used that as a guide.

Now, the foam I was using wasn't very porous, so I was able to skip right to the painting. If you're using a more traditional styrafoam, you'll want to glaze it first using mod podge or school glue thinned with a little water, this way all the paint won't soak into the foam. Then you want to buy my new favorite thing: metallic craft paint. It's inexpensive ($1.50 for 2 oz. at Michaels), works on multiple surfaces, and actually does look metallic. I used the gunmetal color.

You're not going to cover the foam balls in one coat, so don't try. It's better to go with lots of thin coats than thick, uneven coats. It took about 4 coats of paint before I was satisfied with the color, and then I went with one last thin coat to cover any last brush marks or imperfections. And the good thing about thin coats was that by the time I finished painting the last foam ball, the first one was dry enough to paint over, so you could theoretically do it all in one sitting.
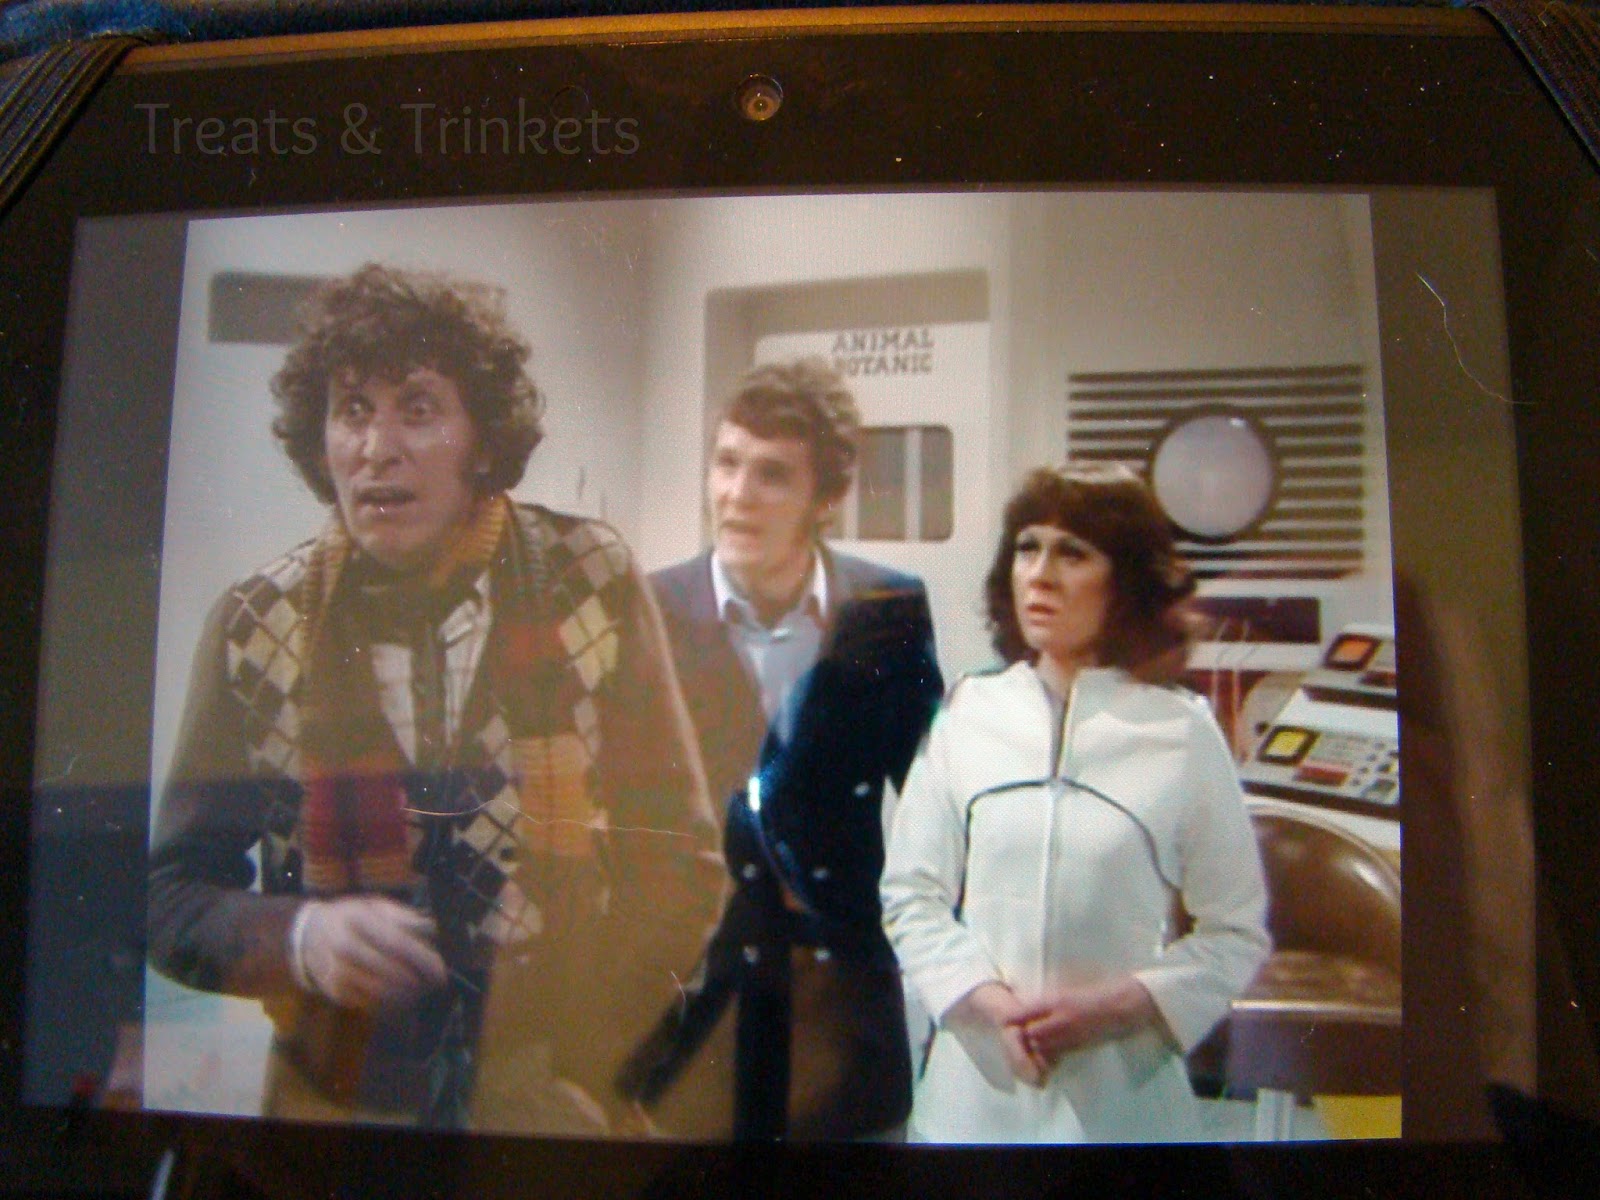
Watching Doctor Who on Netflix helps make this part less onerous.
I'm liking Pertwee.
While your foam balls are drying, you'll want to take some thick, black ribbon and glue it along the bottom edge of the dress. My dress was rather shorter than I would have liked, so I took the opportunity to add an extra inch to the length. I just took the ribbon I had left over from my TARDIS Top Hat, and lined it up with the hem of the dress. Don't try to glue it all at once, you'll make yourself crazy. Work in sections, and let them dry for a few minutes before moving on to the next section.
If you have a cat, he will want to assist you with this part.
Needy McSnuggles says your costume doesn't have enough cat hair
The next step is gluing the foam balls to the dress. Using the waist of the dress as a guide, space out the best arrangement for the top row. It just so happened that 4 worked for me. Then I took thin, black duct tape (left over from TARDIS Dress) and used that to space out the rows. Remember to put it on an angle to account for the flare of the dress. Then just space out the rest of the foam balls-- columns of three worked best for the length of my dress. Once you've got the spacing right, glue it on there (and remember that tacky glue dries clear if you make a mistake).
Let that dry completely (overnight is best) before working on the back of the dress. It's harder to do the back since you can't lay the dress flat, but it's also more important that the front looks good. :3
Watch some more Doctor Who while waiting for your dalek balls (heh) to dry.
Now all we've got left is the waist. Now, I glued the same black ribbon I used on the hem around the waist, but take the benefit of my experience-- that wasn't a good idea. I ended up having to rip off the back half and I was literally hot gluing it back onto the dress mere minutes before I had to leave. The problem is that the ribbon doesn't stretch along with the dress, so it didn't want to go over my shoulders or around my bust. I thought I had planned for it-- I left room in the ribbon along the sides, but it wasn't enough. So instead you might want to go with black elastic ribbon or just paint it on with black fabric paint. Or hot glue yourself into the dress the day of the con. I am proof that that works.
Needy McSnuggles is judging my inability to account for the lack of stretch in the ribbon.

Now onto the eyestalk. This was the part that I think really made the costume. What you need are 1) a paper towel roll, 2) duct tape (the regular silver kind is best. I had white so I used it and painted it silver. Save yourself some steps), 3) a sheet of black craft foam, 4) a blue LED light, found in the flower arranging aisle at most craft stores (mine was left over from TARDIS Top Hat), 5) scissors and hot glue. My beloved tacky glue just doesn't work out here. I know, I tried.

The first thing you want to do is cut the paper towel roll open and measure it around the LED. You want the LED to fit into it, but not fall through it (please note that in the pictures, I had rolled the cardboard too tightly. I ended up having to redo it. The light should be able to sit in the tube without being held.) Wrap the tube in duct tape, and you're gonna want to cut a couple inches off of it. I found this easiest to do after being duct-taped. Hot glue the light into the tube, being careful to make sure you can still turn it on and off.

Cut a wide strip of the black craft foam long enough to go around the light, with a little bit extra. I found it easiest to cut a shallow curve along the bottom of the strip, so when I wrapped it around the light, I was able to have it flare out a bit, allowing easier access to the light. Hot glue it to the tube, then decorate with more thin strips of foam. I added foam around the top to give it more depth, and very thin strips around the sides, to mimic the look of a dalek eye. Then I just added a little bit more of the metallic craft paint, mostly to cover the fact that I am not a neat gluer.
FYI, cats enjoy lying on top of black craft foam.
And they can't resist getting in the picture.
Make sure to test that you can get your fingers in there to turn the light off and on. PSA: the LEDs are extremely bright, and you're basically making a flashlight, so you may accidentally blind a few people since it will be at eye level. Whoops.
Then hot glue the eye stalk to a headband. Glue a small, disposable plastic cup on either side for the "lights." I had originally intended to put actual lights inside the cups, but I thought I already had the two white lights, and I only had one and no time to run to Michaels. If you don't add actual lights, you'll need to add a counter weight of some kind to the headband. Everything that you use to make it is so lightweight that the LED at the end of the eyestalk made it kind of top heavy. I had to keep readjusting the headband all day. Or you might be able to get away with using a heavy duty headband.

As it was, one of the faux lights fell off, so I ended up taking the other one off as well. I'm sure that didn't help the weight disparity either
Fun story: I did a photo op with Stephen Amell (I was buying one for my brother with William Shatner when I thought, ah, what the heck, I'll treat myself), and when it came to be my turn, he jumped back and went "aah" all joking like, then he told me I looked great, and put his arm around me even though we'd been instructed that Stephen had asked for no physical contact (which, considering I'd contracted Con Crud last year, I found to be completely understandable) and you can see that my face is red in the photo, and it appears that Stephen Amell is in possession of the singular talent of being able to make me blush in under 10 seconds.

Arthur Darvill (Rory Williams) also said my costume was great, and Brent Spiner said I was "a vision" (direct quote. I have witnesses!), so despite being a little slapdash, I'd say my costume was a success.
As for the plunger, there is a Home Depot brand one for $3. It's smaller, with a shorter handle, so it's not ideal for actual plunging, but it's perfect for cosplay. The handle was bright orange, though, so I just gave it a quick sanding and painted it with silver metallic craft paint. I didn't have time to do anything for the whisk arm, but I was kind of happy to have a hand free for side hugs from Stephen Amell. Le sigh

October 9, 2014

Peanut Butter Caramel Pie with a Chocolate Cake Crust


Do you remember when I made Black and White Mini Cupcakes and I told you that it makes a buttload of cake? Do you remember when I oh-so-subtly pondered on what one could do with all those leftover, frosting-less mini cupcakes? Yeah, they've been sitting in my freezer ever since.

See, I never know what to do with leftover cake. Usually, I just eat it, but this was a little much just for me. I stirred some chunks into some mocha ice cream, and that was good, but there was enough cake for about 25 gallons of ice cream. So I consulted the interwebz, like you do, and most of the results were predictable. Trifle (meh). Cake pops (ick). Put in ice cream (been there, done that).

Then I found a recipe where the cake was crumbled up, toasted in the oven, and then used like cookie crumbs for a pie crust. Now we were talking.
The only thing that remained was a filling to put in the pie. Something that would pair well with the dark chocolate cake, but was still easy to make (my free time has been taken up by NYCC and prep for the brother's wedding and I still got asthmatic kitty to worry about) and maybe didn't dirty too many pans.

Enter the crazy deliciousness that is this Peanut Butter Caramel Pie from the Cooking Actress. Not only is it peanut butter and caramel, but you make it in the microwave. Chill, top with whipped cream, et voila, vous etes finis. Plus, it makes your house smell amazeballs. Like, if Willy Wonka took over the Reese's factory good.
The toasted cake crumb crust is chewier than a traditional cookie crumb crust, less crisp, but not soggy or soft by any means, and it tastes like cake which is awesome. Plus, you can use any kind of cake you like. Are you gluten free? Use a gluten free cake. Got an egg allergy? Go with an egg free cake. And then there's the peanut butter caramel. Words cannot describe how much you need peanut butter caramel in your life. It's caramel, but with a rich, peanut buttery undertone. Neither flavor overpowers the other, but instead they meld into this amazing new flavor and it is necessary for living

I may or may not be eating this pie right now. For breakfast. Don't judge.

Peanut Butter Caramel Pie
Yield: 1 9" pie (8 servings)

Ingredients
For the crust:
2 cups toasted chocolate cake crumbs (instructions below)
1/2 cup melted unsalted butter

For the caramel:
1 cup packed light brown sugar
1/2 cup heavy cream
1/4 cup creamy peanut butter
1/2 tsp. vanilla extract
Pinch salt

For the whipped cream:
1/4 cup chilled heavy cream
1 tbsp. powdered sugar
1/2 tbsp cornstarch
1/2 tsp. vanilla extract

Instructions
To make the toasted cake crumbs: Preheat the oven to 250 degrees F. Crumble chocolate cake onto a rimmed baking sheet. Bake for about an hour, until the cake is dry. Once completely cooled, pulse in a food processor until finely ground. Store in an airtight bag or container.

Prepare the crust: Preheat the oven to 375 degrees F. Grease a 9 inch pie plate with butter or non-stick cooking spray. Combine the cake crumbs and melted butter, and press evenly into the prepared pan. Bake for 10 minutes, until the crust is set.

While the crust is cooling, prepare the caramel: In a large, microwave safe bowl, add the sugar, heavy cream, and peanut butter, and whisk until completely smooth. Microwave on high for 2 minutes. Remove and stir. Microwave on high for another 2 minutes, or until bubbly and thickened. Stir in the vanilla and salt and let cool until thickened, but still warm. Add to the prepared pie crust, cover, and chill in the refrigerator, minimum 4 hours or overnight.

Before serving, prepare the whipped cream: Add the ingredients to the bowl of a stand mixer (or use a hand mixer). Mix on low until well combined, then gradually increase the speed to high. Whip on high speed until stiff peaks form. Spread evenly on top of the pie and serve.

Tip: Let the pie sit at room temperature for a bit so it's easier to cut

Crust recipe adapted from PastryJane.com*. Pie recipe adapted from The Cooking Actress
*The website where I found the pie crust recipe has since expired, so I can't link to the original