September 24, 2014

How to Make Pasta in the Microwave


So, my new stove and I are not the best of friends. The oven's fine, though I'm pretty sure I found a hotspot, but the stove totally frustrates me. It's an electric stove, and not an especially high-end one at that. My whole life, we had gas stoves, so I'm not used to using electric. And it's soooo sloooow. There's this "hot surface" indicator light so you don't accidentally burn yourself while it's cooling off, and that light doesn't even come on until I've had the burner on for at least 30 seconds. It's not so bad when I'm making chicken or something that requires prep, but it's torture when all I'm doing is boiling a pot of water for pasta. I'm Italian fer cryin' out loud, and I've been avoiding making pasta because it just takes too dang long.

Then I realized I could make a single serving pasta in the microwave. Now I'm eating pasta again and all is right with the world.

This isn't really a recipe, since I don't measure, but it's a technique I had to share.
The things you will need will be:

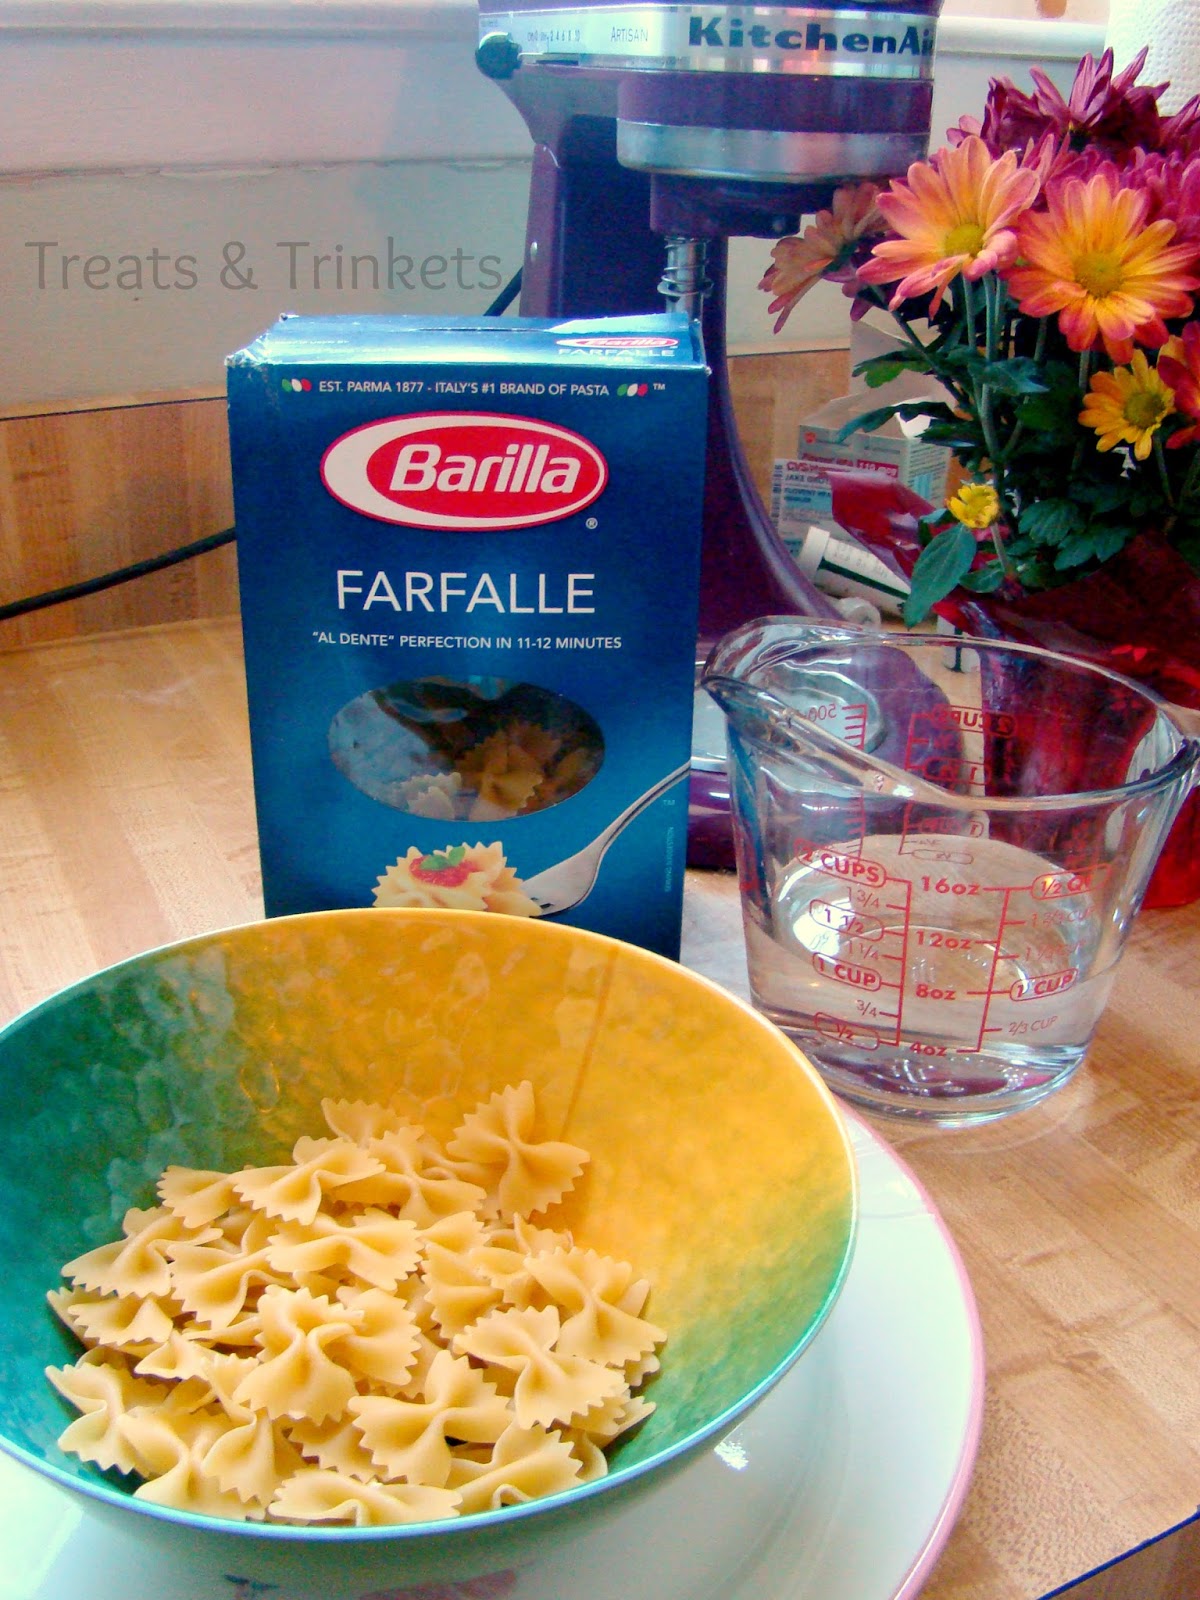
  • A microwave safe bowl (preferably one that is very wide and deep)
  • A microwave safe plate
  • Uncooked pasta, about 1 serving's worth (~2 oz)
  • Water-- enough to cover the pasta
You do not need a Kitchenaid or mums. They are attempting to hide the kitty meds that still managed to get in the frame.
Add the pasta and water to the bowl-- like I said, I never measure. I just pour out what looks like a decent sized serving of pasta and stick it under the faucet. (Just keep in mind that the cooked pasta will expand, so use less pasta than you actually want). The amount of water isn't fussy either: if you add too much, you can drain it off; if you add too little, you can add more while it's cooking.

The reason you want a wide and deep bowl is because the water will boil like nobody's business in the microwave. If your bowl is too small, it will boil over and make a mess. That's where the microwave safe plate comes in-- my bowls are actually the perfect size for this, but on the off chance it does boil over, it's caught on the plate and not all over the microwave.

There are sites that tell you you can do this in a mug. Do not listen to them. It will make a mess and there will be boiling, starchy water everywhere.
Microwave on high for 6-8 minutes. My microwave isn't especially high powered, so I need 8 minutes (and I like my pasta very firm-- you might need to leave it in even longer if you like softer pasta)
Stir every two minutes or so (if the pasta seems too dry, add more water). Test the pasta for doneness at 6 minutes.
Decide how you want to prepare your pasta. My favorite way is with shredded cheese (Mexican blend), salsa, and a pat of butter (about 1/2 tbsp). You could add fresh spinach, artichokes, and shredded swiss for spinach and artichoke pasta; cheddar, shredded or canned chicken, hot sauce, and butter for buffalo chicken pasta; even just mix in some garlic, olive oil, and fresh basil. Whatever your little heart desires.

Please note: a TARDIS does not actually help you make the pasta, but is always recommended.
Now, using pot holders because the bowl will be very hot, remove the bowl from the microwave. There will be a little water left in the bowl-- that's great if you're looking to melt cheese or wilt spinach (though if there's a lot, you may want to drain some out), so leave it in there. Add your mix-ins and stir it up.
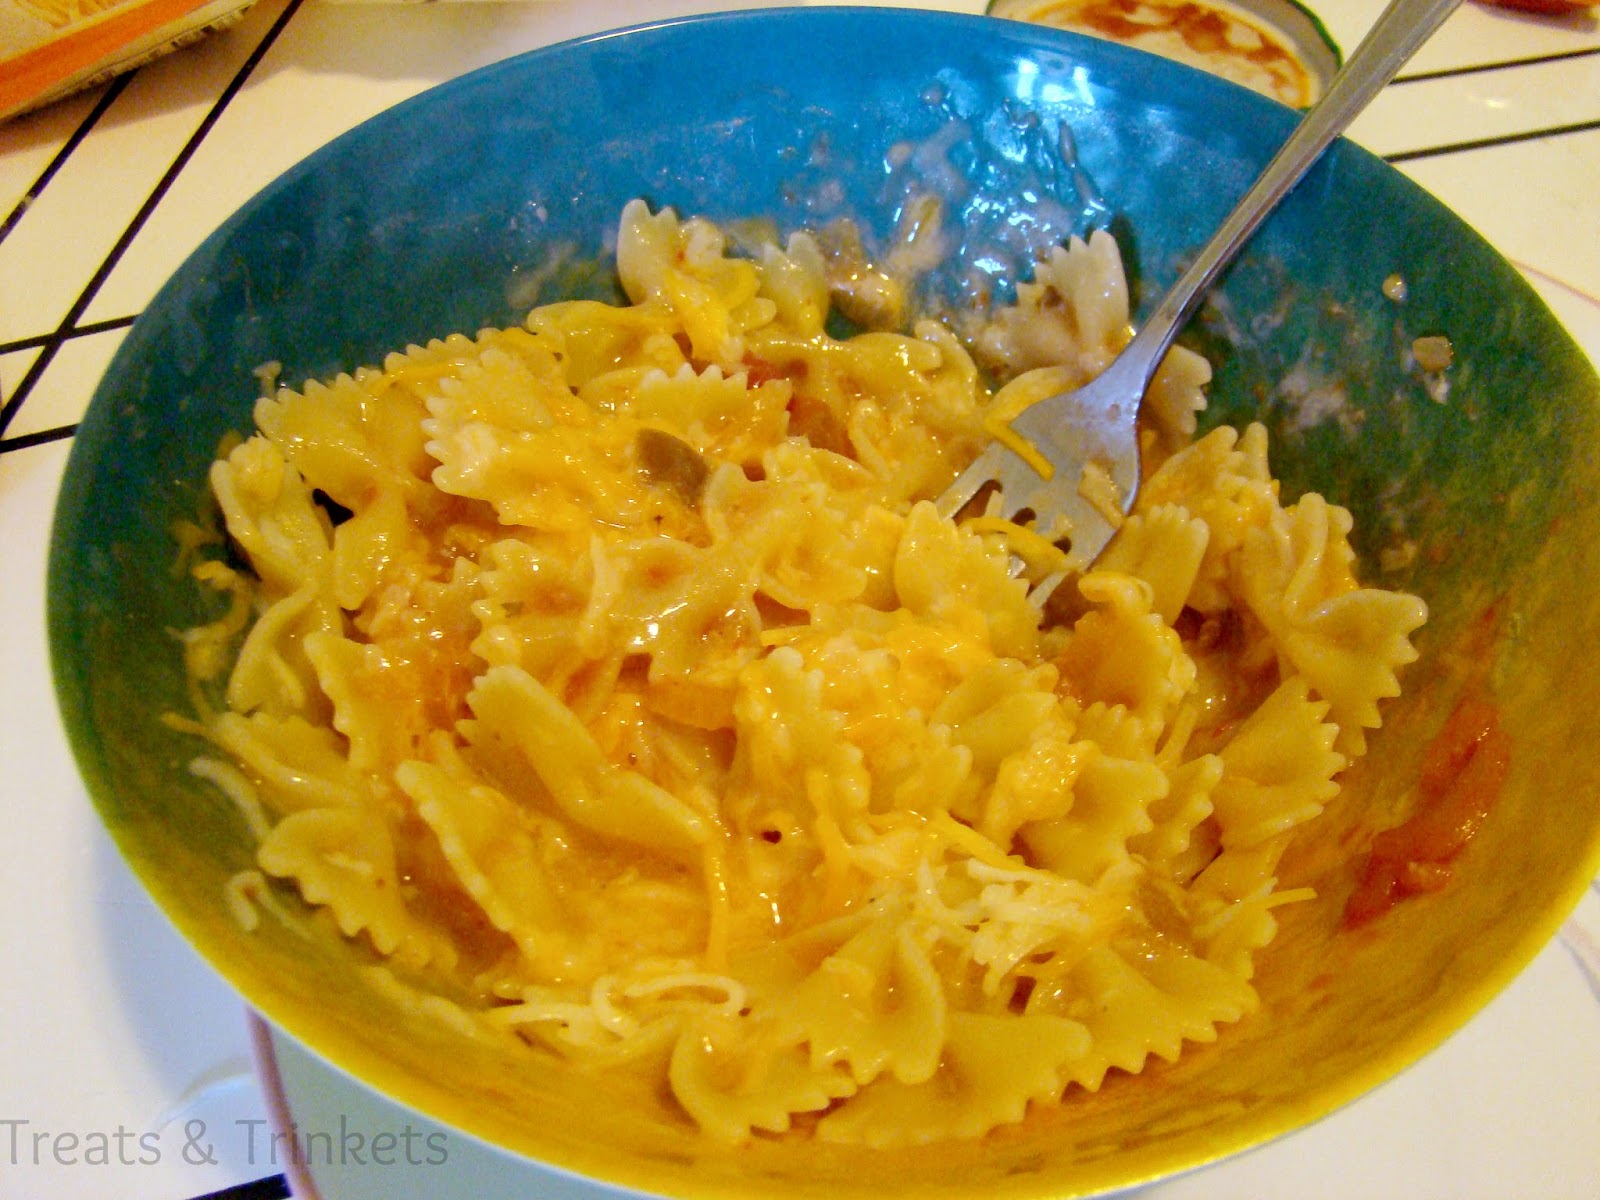
Once the mix-ins have been melted/wilted to your heart's content and are well mixed, return the bowl to the microwave for another 30 seconds to 1 minute on high.
And serve! A bowl of fresh pasta has never been so easy and required so little clean up. Now, is it as quick and easy as Easy Mac? No. Easy Mac is specially formulated to be, well, easy. But is it still quick and easy, not to mention much tastier, healthier, and cheaper than Easy Mac? You bet your booty it is.

Just remember to be super careful handling the bowl after cooking, since it will be very hot. You could transfer the pasta to another dish, or you could do it my way and just wrap the bowl in a dish towel. That way you can still have it on your lap to eat while watching the season premiere of Sleepy Hollow (I have three words for you: naked Benjamin Franklin)

I have not tried this method with whole wheat or gluten free varieties, but I dare say it should translate. I'd just suggest using more water, since they tend to absorb more of it, and cooking times may need to be adjusted.
Technique adapted from various internet sources, but mostly from Ella Claire

September 17, 2014

Banana Crunch Parfait


So, my interwebz has been on the fritz lately, which is why this wasn't posted last week. Sorry, lovelies.

Anywhozzle, did you know that September is National Whole Grain Month? It is. I'm not exactly the world's healthiest eater, but I usually try to incorporate a lot of whole grains in my diet. Why whole grains? As the name implies, they use the whole grain which means it has more nutritional value, rather than refined grains which have most of the nutrition processed out. Whole grains are good sources of fiber, which helps fill you up and keep you from over eating, but are also a good source of other nutrients like magnesium. For those of you that don't suffer from migraines, you might not know that migraines can sometimes be caused by a magnesium deficiency. So if a carb that's already better for me nutritionally might help prevent me from having migraines, you bet your booty that I'm going to try and eat that one more.
To celebrate National Whole Grain Month, I made these magnesium-rich Banana Crunch Parfaits (bananas and yogurt are also good sources of magnesium. Word) with Great Grains Banana Nut Crunch Cereal. I got a chance to try Great Grains cereal for the first time, and let me tell you-- holy crunch, Batman! The cereal was at like granola-levels of crunchiness, which was awesome. It wasn't quite sweet enough for me, but mixed with the sweet ingredients of the parfait, it worked great. I've been eating the Vanilla Graham flavor for breakfast, and I'm loving it.

As for the parfaits themselves, they're an awesome, quick breakfast. I even liked the honey drizzle on top as that extra sweet kick, even though I'm not usually a fan of honey. The only change I would make would be to use fresh strawberries instead of the canned pineapple, since I found the pineapple to be a little jarring, both in flavor and texture. I think the strawberries would just go better-- and who doesn't like strawberries and bananas together, amiright?
I used Stonyfield Farm Greek yogurt for extra protein, and got an eminently satisfying breakfast. You could make them as a healthy snack, or even a healthy alternative to dessert, if you're into that sort of thing. They do need to be eaten immediately, so the cereal doesn't get soggy. But trust me, you won't have a problem doing that. I didn't have parfait cups, so I made one giant parfait instead of 6 little ones and I may or may not have eaten the whole thing in one sitting. It's okay because it's healthy, right?

Banana Crunch Parfait
Yield: 6 parfaits

Ingredients
1 cup low fat vanilla yogurt (I used Greek yogurt)
1 medium banana, sliced
1 (20 oz.) can pineapple chunks in juice, drained
1 cup Great Grains Banana Nut Crunch Cereal
1 cup honey

Directions
Spoon half of the yogurt into 6 parfait glasses. Layer with half of the banana slices, pineapple chunks, and cereal. Repeat the layers, and drizzle the honey on top.
*Disclaimer: I received free samples of Post Great Grains cereal in order to feature this recipe. I was under no obligation to review if I so chose, and I receive no further compensation from this post. All opinions are, as always, my own*

September 3, 2014

Baked Buffalo Chicken Strips


You know what I actually really love? Frozen chicken strips. Especially the flavored ones: the honey barbecue and the cajun style and the buffalo ones. I'm a food blogger, I'm not supposed to admit my love of processed foods to you, but there it is.

Do you know what I hate to do? Go food shopping. I blame it on my inherent dislike of interacting with people. (I'd make a really good hermit) I also hate using the carts, because they're so awkward. When you're shopping by yourself and you have a cart, how do you check out? Do you stand in front of it for ease of reaching the items and then be that weird person with no one pushing their cart? Or do you stand by the handle and pop your arms out of the socket trying to reach the items? I'm only shopping for me, so I'm never in a million years going to fill the cart, so I've got this bulky thing taking up an entire aisle, trying to squeeze past other people with the same bulky thing, for no reason other than I can't fit an 8-pack of toilet paper in a basket.

(My grocery store just started providing these smaller carts that are basically two baskets stacked on top of each other, and it's actually the greatest idea grocery stores have ever come up with.)
Any way, my point is that when I do manage to drag myself to the grocery store, I usually get things that will last me a while. I generally do get some frozen chicken or pizza to tide me over on the nights I don't feel like cooking, but I've also learned to love the value packs of meat in the butcher section. I get it home, separate it into freezer bags, and I'm rarely ever without some kind of meat for dinner. My favorite are the boneless, skinless chicken breasts. They usually come about 6 to a pack, and since I'm cooking for just little ole me, that usually lasts me a good, long while.

I had a couple chicken breast defrosting in the fridge, and had a craving for some crispy chicken strips. Now, I could have just done my Crispy Oven-Baked Chicken Strips, but remember how I started this post with how much I love the flavored, frozen chicken strips? I decided I was going to make my own, healthified version.

I started by slicing the chicken into strips and marinating them right in the buffalo sauce. The longer you marinate it, the more flavor the chicken will absorb, so overnight is recommended (but if you're not a planner, you know, like me, then 2-4 hours is fine). Dredge in seasoned flour, eggs whisked with more hot sauce, and panko, and bake.

You could totally skip the flour/egg bit and just take the chicken in the sauce and toss it in panko, but I like a lot of breading and unnecessary steps.
How did they taste? Well, the buffalo flavor was definitely there but not as prominent as I would have liked. I could have tossed the cooked strips in more buffalo sauce, but I don't like my strips too saucy. Maybe next time I'll just use hot sauce instead of ready made buffalo sauce. Otherwise, they were crispy, juicy, and flavorful, just the way I like them. Served with some more buffalo sauce for dipping (or, you know, drizzled on top all fancy-like because you're a food blogger) and some homemade ranch (I used this recipe, minus the dill), and they're pretty nearly perfect

Baked Buffalo Chicken Strips
Yield: 10-12 chicken strips

Ingredients
1½ lbs boneless, skinless chicken breasts, cut into strips
½ cup plus 2 tbsp. buffalo sauce*
¾ cup whole wheat or all purpose flour
1 tsp. smoked paprika
½ tsp. cayenne pepper
½ tsp. garlic powder
¼ tsp. freshly cracked black pepper
2 eggs
1½ cups unseasoned panko bread crumbs
Cooking spray
Extra buffalo sauce and ranch dressing, for dipping

Directions
In a large zip top bag, add the chicken and ½ cup buffalo sauce, making sure the chicken is well coated. Marinate in the refrigerator 2-4 hours, or overnight.

Preheat the oven to 425 degrees F. Line a rimmed baking sheet with foil, and fit with a wire rack. Spray well with cooking spray.

Take 3 wide-mouthed shallow bowls. In the first, mix together the flour, cayenne, paprika, garlic, and black pepper. In the second, whisk together the eggs and the remaining buffalo sauce. Add the panko to the third.

Remove the chicken from the marinade, and use paper towels to wipe off the excess sauce. Working with one strip at a time, toss the chicken in the flour, shaking off the excess. Dip in the egg wash, letting the excess egg drip off. Toss in the panko, making sure the strip is well crusted. Place on the prepared rack, spray the chicken lightly with more cooking spray, and bake 10-12 minutes, until the chicken is cooked through. Serve warm, with extra buffalo sauce and ranch dressing for dipping.

Note: I didn't add any salt because the prepared sauce usually has enough for my tastes. Feel free to add to taste. The cooking time will also vary depending on the size of your strips.

*You can use hot sauce for a more intense flavor and spice

Recipe by Kim
Om nom nom chicken strips