September 29, 2013

DIY TARDIS Dress


So, I'm pretty much done with my cosplay for NYCC. YAY. I have to say, it's been pretty fun to flex my crafting muscles again. It's been so long since I did something crafty for the sake of crafting- especially something that doesn't involve food. I forgot what it was like to get into the zone; it's very zen. And there's something to be said about having paint- and glue-splattered fingers and not caring. I just wish I had more time for it. And a house elf to clean up after me.

Anyway, TARDIS dress is complete! Well, mostly. I might add a little something later on. But that's not important. If you can use tape and wield a paint brush, you too can make a TARDIS dress (or TARDIS anything else. I think more guys should dress up as the TARDIS. I've seen a couple really awesome male TARDIS cosplays). It's a bit involved, but not hard, not in the least.
You want to start with a blue dress. Any dress, although you want to stick with cotton or a cotton blend because that works best with fabric paint and iron on transfers. I gravitated towards the peplum style, because it just felt very architectural and TARDIS-y, but style doesn't really matter much. Anything comfortable (and as cheap as you can get is your best bet). I got this from Forever 21 for about $20.

First things first: always, always wash clothes before modding them. New clothes are treated with stain resistors that will also resist glues, paints, and dyes. I've actually used this to make some cool tie-dye patterns in the past, but that's not helping us here. Follow the directions on the tag, or when in doubt- wash on a gentle cycle with mild detergent.

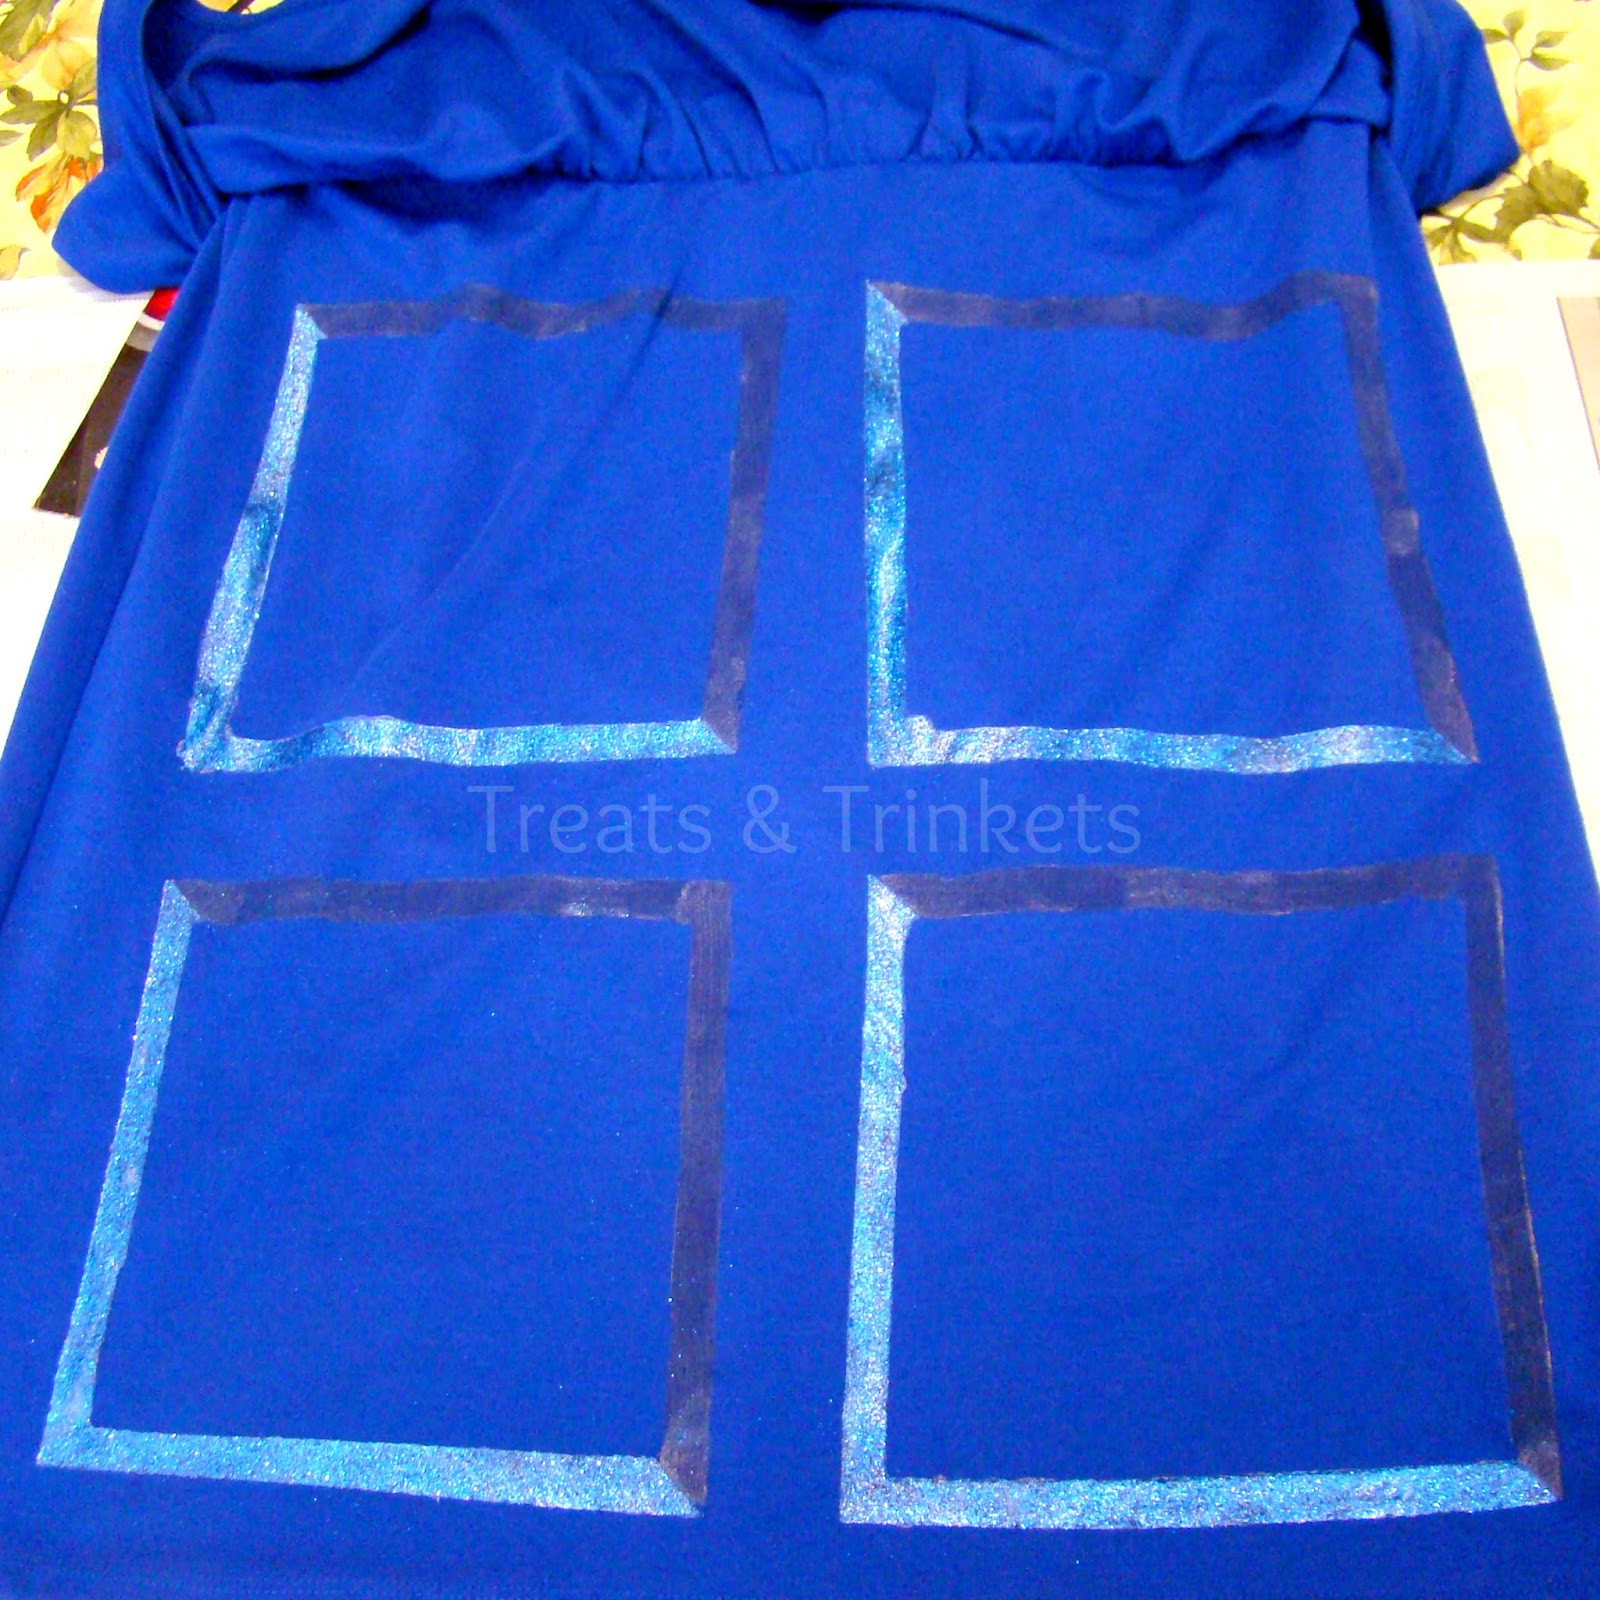
Lay your clean and dry dress out on a flat surface. Put cardboard inside to prevent the paint bleeding through, then center the dress as best you can. Make sure all the seams are matched up. It'll prevent things from getting wibbley-wobbley.
Next is the most time consuming part: the taping. Just use regular blue painter's tape (I only had the really thick kind, so I had to cut it down and it was really annoying). Start by taping down the center of the dress. This will help you orient things.

Then, divide just the skirt into equal squares. The size of your squares is going to depend on the dress, and your own personal preference. I measured things out, tried the dress on, measured things while wearing the dress, took off the dress and measured some more. There's no such thing as too much measuring. Anyway, my final estimate was to have the squares be 8 inches, with an inch and half between them. Again, you might need to use different measurements. Measure, measure, measure.

Then tape inside the squares, leaving a half inch strip. That's the strip we're going to paint, so make sure to keep things even.

When all four squares are taped off, tape diagonally from corner to corner. I originally saw this tip here, and I loved it so much I had to try it myself. This is going to help give us panels with a more 3-D look.
Now's when the paint brush skills come into play. The first half of the panels, paint with a dark blue fabric paint (I used Navy, but just make sure it's significantly darker than your dress), then let that dry completely, about four hours. Move the tape so you can paint the bottom half of the panels.

Now, in the tutorial I linked above, she used a light blue paint for the bottom corners, but the light blue paint that I bought wasn't light enough and ended up blending into the fabric. But I had just so happened to pick up some blue glitter (extra fine, from Michaels. The color was Sapphire), thinking I could totally find someplace on the dress to use it. I certainly did.

Paint the panel with fabric or tacky glue like you did the paint. Cover completely with glitter. Allow to dry, then shake off the excess. Then seal in the glitter with glossy mod podge (any other will dull the glitter. I don't know about you, but I want my glitter to really shine. I learned this tip here). Let that dry until it's clear, and remove the painter's tape.
The panels came out really cool. They're hard to see in the full dress pictures, so here's some TARDIS panel eye candy for you. I'm kind of in love with these panels, okay?
Since I'm using a peplum style dress, I also had the top skirty part to do. Tape and paint the panels in the same way. For the pull to open sign, and the St. John's Ambulance medallion, I printed them on iron-on transfer paper, then ironed them onto adhesive-backed felt. You can iron them right onto the dress, but since the skirt has a flare, it's next to impossible to get the fabric completely flat (the panels got a bit wonky when I was painting them, but you can't really tell), and putting it on felt first just gave me a little added security. Just make sure to size them to fit inside the panels. Always print out a test first so you can see how it works, and measure, measure, measure.

The pull to open printable I used is here, and the St. John's Ambulance logo can be found here.
All we've got left are the windows. I used white adhesive backed felt. Just cut t down to squares the same size as your panels (mine were 8 inches). Then I outlined the windows with black glitter ribbon, because glitter, and separated the panes with thin black duct tape I found at Michaels. You can use more duct tape if you don't have glitter ribbon. This is the kind of stuff that I own.

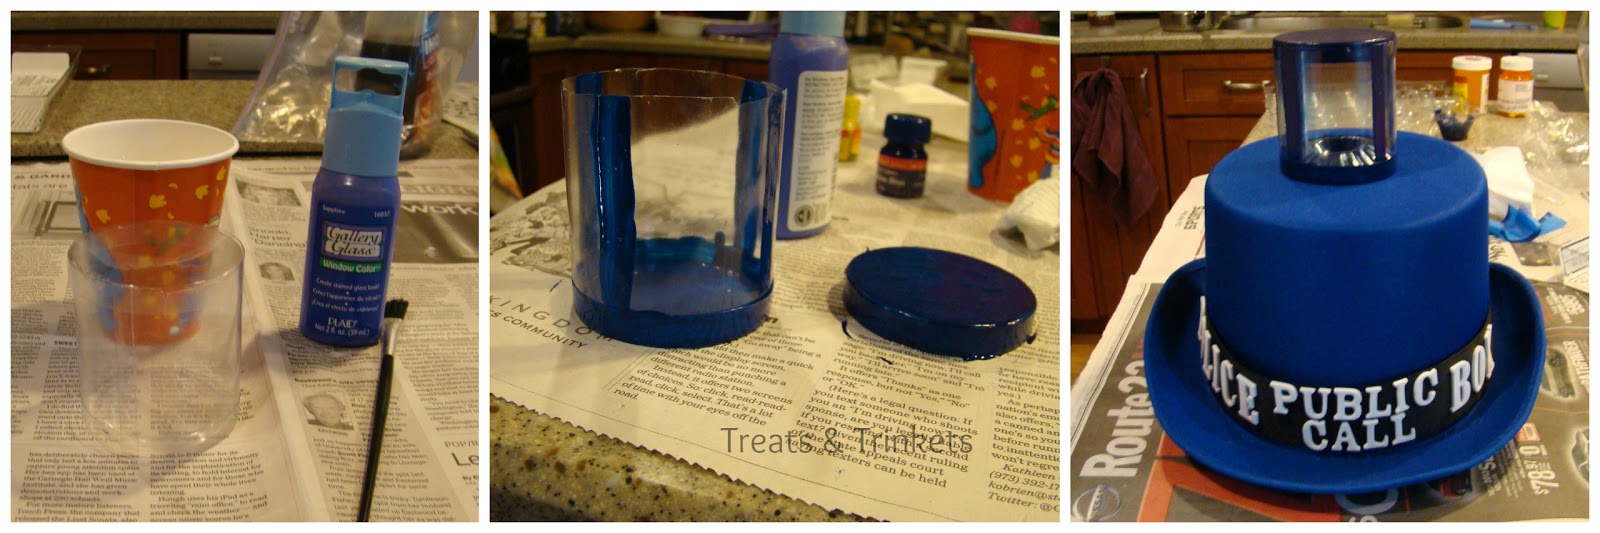
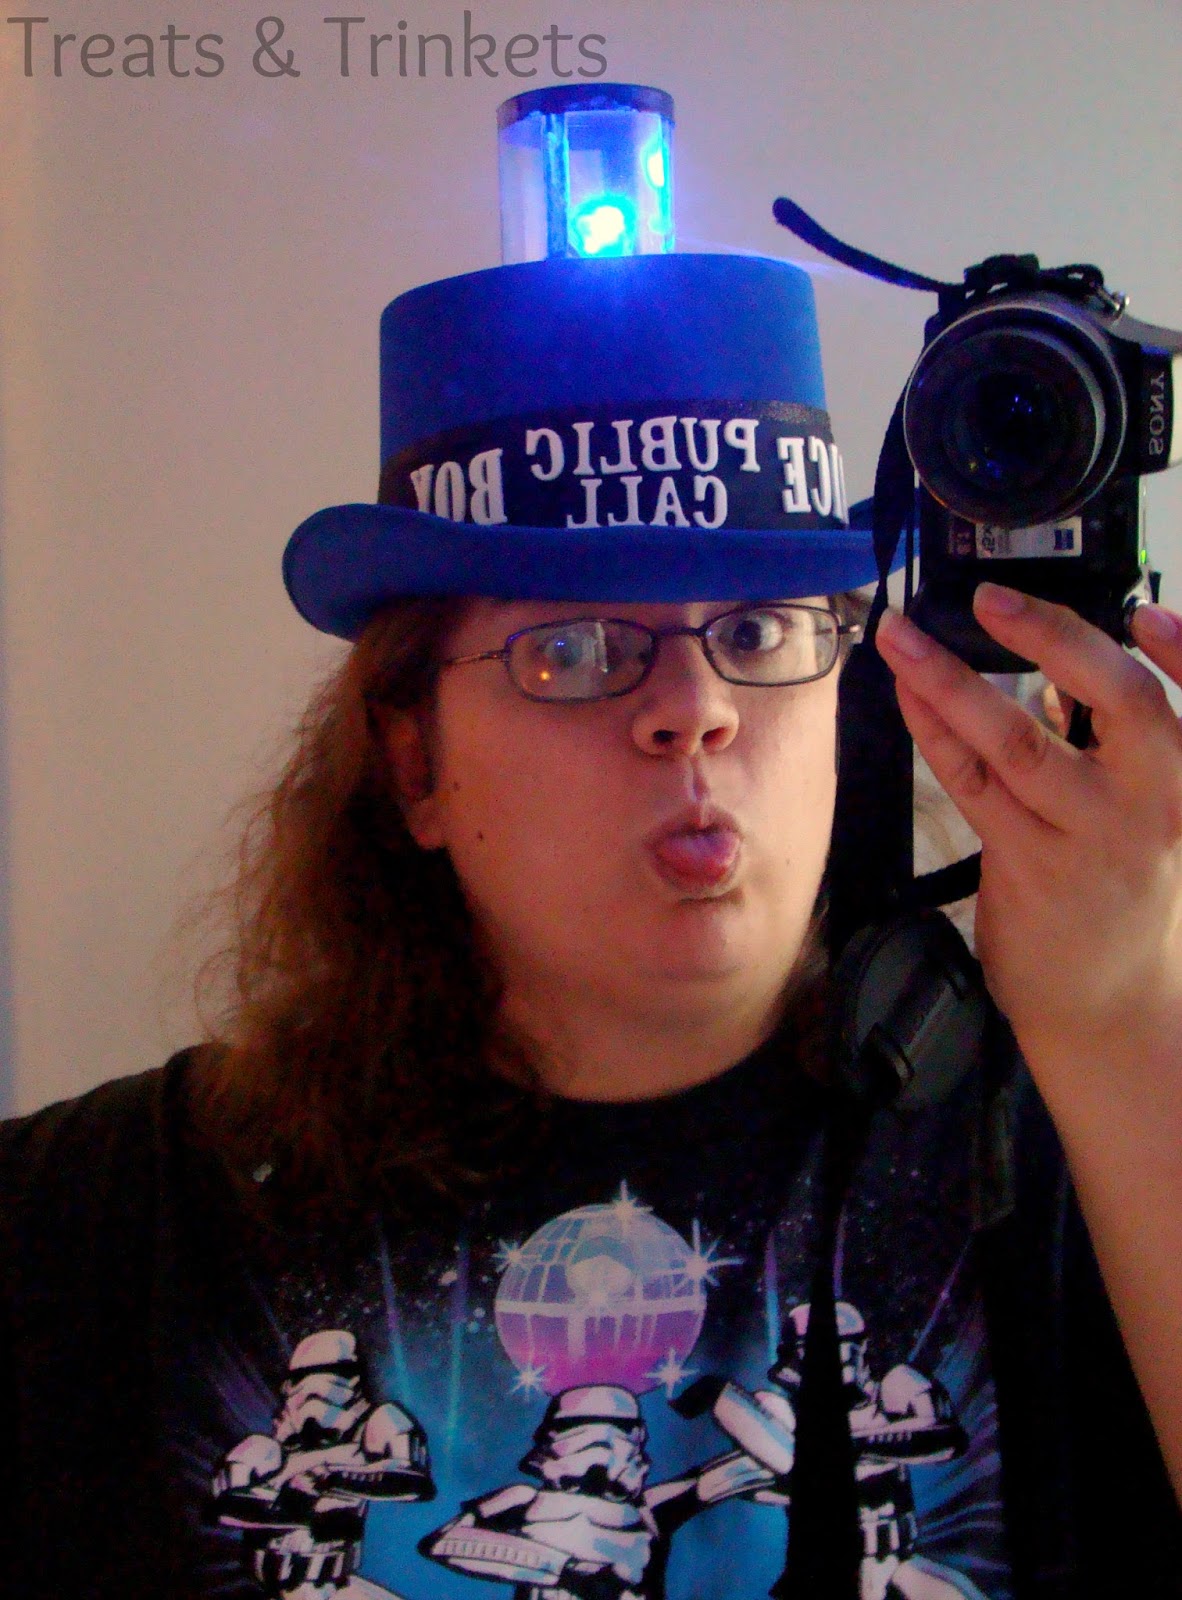
And that's all there is to it. Remember, I already made the top hat, so I don't have to add the "Police Public Call Box" sign.
Sorry, no selfie this time. Because that would have involved changing out of my sweat pants. And my hair was a mess, and just no.

But did you know that there's actually a TARDIS dress commercially available for Halloween this year? And it's actually kind of awful. It's weird looking, and doesn't come with anything except the dress. Total gyp, in my opinion. Especially when it's so easy to make your own.

September 27, 2013

Stuff and Things 9/27/13

So, I decided to try a new thing, where once a week I just take the time to talk about whatever. Stuff and things (which is a phrase I'm shamelessly stealing from my friend. Hi Lil!). It's not really a round up thing, since I only do two posts per week, but I wanted a place where I can talk about books or music or TV or whatever without taking away from the recipe I'm posting. And maybe even post excerpts from what I'm writing, if I ever get brave enough to do that.

Fair warning: any talk of TV/books/movies will likely contain spoilers, but I'll make sure to post it under a jump cut, so it won't be plastered all over my homepage.

So let's get started!

Life as I Know It
A couple really cool things happened recently. My Twitter account was featured on Shari's Berries as one of their "100 Dessert Lovers to Follow." Which feels a little odd, since I don't use my Twitter that often except for Triberr, and the occasional rant about work or retweet from The Mary Sue. So, it's more of a win for my tribemates, whose recipes I share. Go you, my Triberr peeps! Still, it's pretty cool.

Also, RecipeGirl pinned my Pumpkin Spice Marshmallows. Oh. My. GAH. I'm like so totally starstruck. I don't have the words. (And if this can strike me speechless, I am very worried about the chance of meeting John Barrowman at NYCC.) I just, I'll be over here fangirling, okay?

 
This is one of my favorite videos ever. 

Speaking of fangirling, I've made it my mission to watch all the vlogbrother videos from the beginning. It's quite the undertaking, but I'm already 150 videos in, and it's been a lot of fun seeing the genesis of the nerdfighters, and Hank geeking out about Deathly Hallows, and recognizing bits that John will later put in his books. Plus, in my pants jokes never get old, and did they ever actually make the evil baby orphanage book? Because that sounded awesome.

Music
Five For Fighting released a new album. YAAAAAAY!!! I've been in love with Five For Fighting almost as long as I've been in love with Joss Whedon, so it's been a significant portion of my lifespan. And one of his songs, "Transfer," actually inspired my 2011 NaNo Novel, which I am currently in the process of editing. (blech, editing) So I totally preordered the new album, Bookmarks, without hearing a single note, and I was not disappointed.

(Before I go further, I should explain that Five For Fighting isn't a band. It's one guy, John Ondrasik. Just so I don't confuse you)

"What If," the new single (video above) is a good song, but it was definitely a safe choice for a single, since it reminds me a lot of "Chances." It's a bit classic Five For Fighting. And I don't really get the video. Okay, I get that the robot sacrifices his heart to save the little boy, but where did the little boy come from, and why the balloons at the end- was it the robot's dream to fly? There were a couple parts with wings, but they didn't seem hugely important. Was it some sort of dystopian future where robots outnumber humans? I feel like I'm missing pieces of the story, and it's a little frustrating, since story is one of the most important things to me.

But that's not really important; it's just a symptom of my neurosis. What's important is that "Heaven Knows" is one of the best songs I've heard in a while. And "Symphony Lane" is a great, sweeping opus, that speaks a lot to his classical training. And "Down" is just a sweet song that is my new favorite. It's hard not to like any song that opens with "Hey good looking/what you got cooking?" and you're listening to it while baking. It's a good album; I definitely recommend it


September 25, 2013

Cherry Almond Oatmeal Cookies


So, I made a thing. And I guess people liked the thing? So I'm sharing the thing.

I always forget that there's something fundamentally weird about the way I develop recipes. Like how "develop" is a pretty generous word for what I do. And being in the foodie blog world, I forget that developing recipes isn't actually a thing that most people do. When most people go to bake cookies, they usually already have a recipe that they then follow. I don't always follow the recipe, even when I start with one. And, especially since starting this blog, I often don't even start with a recipe.
So when this weekend I used my patented recipe development process to bake cookies for my cousin's graduation party (I know it's September. I know normal people don't have graduation parties in September, but I never claimed we were normal people), I was a little blown away with the reaction these cookies got. I mean, they're pretty good cookies, and I guess they're not exactly a common sort of flavor, but like, whoa, these cookies were completely inhaled, and then raved about. And a lot of people kept asking me how I do it.

I'm glad that people usually ask me that after they try my recipes, because my usual answer of "throwing ingredients into the mixer until it looks like cookie dough and then praying to Betty Crocker it comes out edible" doesn't really inspire confidence.
So making these cookies was like making up any other cookie recipe, except I was a little more limited in terms of ingredients, since my cousin has a wheat allergy, and I was out of gluten free flour mix. I'm not one of those bakers with all the weirdy flours lying around the house, but I did have almond meal and oats. Those, I could work with. Now, you can buy oat flour, but it's easy enough (and probably cheaper) to just pulverize uncooked oats in a food processor. My food processor is small and inexpensive, so I didn't bother trying to get a fine grind. My cookies ended up having more of an oat-y texture, which no one seems to have a problem with, but if you have a fancy food processor, you could probably get a smoother texture.

I've recently become enamored of the cherry/almond flavor combination, so when I found half a jar of maraschino cherries in the fridge, that was happening.

I did have to add a little xanthan gum, since the dough was not binding the way I wanted it to, and I was so paranoid about the cookies coming out dense and dry, I didn't want to add more oats. Almond meal doesn't absorb liquid very well, but I originally thought the oat flour would balance that out. You might be able to get away with using corn starch instead, since oat flour's usually okay without the gum, and egg whites work well as binders. I haven't tested it though, so don't come crying if it doesn't work.

(Xanthan gum is often used to replace gluten as a binder/thickener. You can usually find it in health food stores or any store that has a large selection of gluten free baking supplies)

Then I just mixed in the diced cherries, and some vanilla chips (white chocolate also work). But they were kind of ugly when I took them out of the oven, so I mixed up some maraschino cherry juice and powdered sugar, with just a drop of almond extract, and made a pretty pink glaze that I then used to doodle on top of the cookies. (I don't drizzle; I doodle)
So that's how these cookies came to be. When I tasted them, I thought, "hmm, not too shabby." But my focus group was slightly more effusive. They have a great flavor, without having any weirdy gluten-free texture. They're best eaten day of baking, since they get a little soft afterwards, but if I hadn't kept some for myself at home, I wouldn't know that. Not even the crumbs were left behind.

Cherry Almond Oatmeal Cookies
Yield: 32 cookies

Ingredients
1¾ cups almond meal
1½ cups oat flour*
1 tsp. baking powder
1 tsp. xanthan gum
¾ tsp. salt
½ tsp. baking soda
¾ cup sugar
½ cup (1 stick) unsalted butter, at room temperature
2 egg whites
2 tbsp. maraschino cherry juice
½ tsp. vanilla extract
¼ tsp. almond extract
¾ cup diced maraschino cherries (about half a jar)
¾ cup vanilla chips (or white chocolate chips)

For the glaze(optional):
1 cup powdered sugar
3 tbsp. maraschino cherry juice
Splash of almond extract

Directions
Preheat the oven to 350 degrees F. In a mixing bowl, mix together the almond meal, oat flour, baking powder, xanthan gum, salt, and baking soda. In the bowl of a stand mixer, or in a separate bowl with electric beaters, cream the butter and sugar together at medium speed until fluffy (about 5 minutes). Add the egg whites, cherry juice, and extracts, beating well after each addition. With the mixer on low speed, gradually add in the dry ingredients, scraping down the sides of the bowl as needed, until a batter forms. Fold in the diced cherries and vanilla chips.

Drop the batter by rounded tablespoonful on a cookie sheet lined with parchment paper or a silpat mat, about 2 inches apart. Bake 10-12 minutes, until the edges are a golden brown. Let cool on the pan for 5 minutes before removing to a wire rack to cool completely.

If desired, mix glaze ingredients together until smooth. Drizzle over the cooled cookies. Let dry before serving.

Tip: Make sure to use certified gluten free oats if making for someone with an allergy or intolerance.

*To make your own oat flour, pulse uncooked rolled oats in a food processor until it looks like flour

Recipe by Kim

September 22, 2013

Apple Spice Waffles #SundaySupper


Today's #SundaySupper is all about fall foods.

We've already established the fact that I'm not the hugest fan of pumpkin, but I love the warm spices prevalent at this time of year; the cinnamon, the nutmeg, the ginger and all spice. And I love love love apples. Especially the fresh picked ones, yum.

I don't cook with apples too often since I'm generally too lazy to chop them, and I don't like when they get mushy, as often happens with cooked apples. But I love appley baked things like apple muffins and apple cake.

And these waffles, they totally taste like apple cake. But better since they're ready in 10 minutes and you can eat them for breakfast.

Since I don't make waffles that often, I started with a reliable base recipe, from you know where. Then I subbed in some whole wheat flour, added about a cup of diced apples, some brown sugar, some apple pie spice, and I replaced the oil with browned butter.

Oh yeah, they're as good as that ingredient list suggests. A totally decadent, season appropriate breakfast treat.
Apple Spice Waffles
Yield: 8 waffles*

Ingredients
1 cup all-purpose flour
1 cup whole wheat flour
1 tsp. apple pie spice
1 tsp. baking powder
1 tsp. baking soda
1/2 tsp. salt
2 cups buttermilk
2 eggs
1/3 cup packed brown sugar
1/3 cup browned butter
1/2 tsp. vanilla extract
1 cup diced apples

Directions
In a large mixing bowl, whisk together the flours, spice, baking powder, baking soda, and salt. In a separate bowl, mix the buttermilk, eggs, sugar, browned butter, and vanilla extract until smooth. Add the wet ingredients to the dry and mix until a batter forms (some lumps are fine). Fold in the diced apples. Cook in a waffle maker according to the manufacturer's instructions.

*My waffle maker is on the small side; if you have a larger waffle maker, you might get closer to 6 waffles

Recipe adapted from The Good Housekeeping Illustrated Cookbook


Celebrate fall with the rest of the #SundaySupper crew:

Amazing Breakfasts, Brunches, and Breads
Outstanding Soups, Starters and Sides:
Comforting Main Dishes:
Decadent Desserts:
Tasty Drinks:

September 18, 2013

Pumpkin Spice Marshmallows


I don't know why I do this to myself every year.

I blame the internet. It's peer-pressured me into doing things I don't want to do. But at the time, I think I do want it, because I see all the pretty pictures on Pinterest, and I go hmmm, that does sound good. And then I open the can, and the smell hits me, and I don't want to continue, but I do because otherwise I opened that can for nothing.

I still don't like pumpkin, you guys. I've tried and I've tried. Every year, I get seduced by the "pumpkin ALL THE things" season. Every year I make something, and think, "this is going to be awesome because the internet has lead me to believe that all things with pumpkin taste like rainbows and sparkles." And then every year I remember, "oh yeah, I don't like pumpkin."
These marshmallows are no exception. They are very pumpkiny. Not gonna lie, it was very difficult for me to taste one. The smell of pumpkin puts me off. But they taste like pumpkin, if you like that sort of thing.

I wish I could tell you, "Oh these are the best marshmallows in the world," and "the flavors meld together because of this, this, and this." But I'd be pulling that out of my behind, and I think we know each other well enough by now to not be disingenuous, don't you agree?

They're very sweet. They're very pumpkiny. They've got a little season-appropriate spice. If you're into that sort of thing, you'll like these marshmallows. If not, come sit by me and let's commiserate over the not-liking-pumpkin-during-pumpkin-everything-season thing.

Pumpkin Spice Marshmallows
Yield: 77 marshmallows (in theory)
 
Ingredients
1/2 cup cold water
3 packets unflavored gelatin (about 3 tbsp.)
1
½ tsp. cinnamon
1/2 tsp. nutmeg
1/2 tsp. ginger
1/4 tsp. allspice
1/4 tsp. cloves
1½ cups sugar
1 cup light corn syrup

1/4 cup water
1/4 cup molasses
1/2 tsp. salt
1/2 cup pumpkin puree
Non-stick cooking spray
Powdered sugar


Directions
In the bowl of a stand mixer with the whisk attachment, add ½ cup of the water, gelatin, and spices and let soften. Spray a 7x11” baking dish with cooking spray and sprinkle liberally with powdered sugar. Set aside.


In a LARGE saucepan, add sugar, corn syrup, 1/4 cup water, molasses, and salt. Heat on low, stirring constantly until the sugar is completely dissolved. Heat mixture to boiling. Let boil, without stirring, until the mixture reaches 240°F (the soft ball stage) on a candy thermometer, about 30 minutes. Remove from heat.


Start the mixer on low speed, and CAREFULLY add the syrup to the softened gelatin (please utilize a splatter shield, if available). Increase the speed to high, and whip until the mixture is off-white, fluffy, and tripled in size, about 10 minutes. Using a rubber spatula sprayed with cooking spray, quickly fold in the pumpkin puree and spread the mixture evenly into the prepared baking dish. Let sit uncovered overnight.


Dust a cutting board with powdered sugar. Using a sharp knife or pizza cutter sprayed with cooking spray, cut the marshmallows into 1 inch squares. Toss in powdered sugar and serve.


NOTE: The sugar syrup is extremely hot and can be dangerous if not handled correctly. It will boil violently, so use a large saucepan to avoid spills. Use potholders and splatter shields when necessary,
and always avoid distractions when making any kind of candy.


Recipe by Kim


September 15, 2013

DIY TARDIS Top Hat


Guess what guys? New York Comic Con is less than a month away. Like, whoa, where did the summer go? Like I've mentioned before, I've been in full cosplay mode, putting everything together.

Now, I'm not one of those crazy-awesome people who have the full-size, screen accurate cosplays with the moving parts and the blinking lights and the metal working and the sewing. I wish I was, but I don't nearly have the skillset to pull that kind of thing off. I tend to go more casual: a military-style bolero jacket and a pettiskirt with brass accents for a basic steampunk outfit; a blonde wig, squid hat, and a Knights of Good t-shirt for a Clara costume. A modded top hat and a blue dress for Time And Relative Dimension In Space cosplay. Basic, easy, and immediately recognizable.

My original intention was to make a small fascinator or one of my tiny top hats in TARDIS blue for this costume, but when I was putting all the pieces together in Polyvore to see how they worked together, I fell in love with a blue fedora. But it was from the UK, and even if they did ship to the US, I wasn't willing to pay international shipping fees. In it's place, I was able to find the perfect blue top hat on Amazon for only about $7.

And since this is easy-mode crafting, I figured I'd share how to make it yourself. Halloween is coming up, after all.
So we're going to start off with the top hat, adhesive foam letters in two sizes, and thick black ribbon, at least  an inch and a half wide. And the glue/adhesive of your choice. I like tacky glue, but double sided tape works well, too.

I had a lot of trouble finding plain white letters in two sizes and matching font. I originally wanted iron-on letters, but I couldn't find what I needed. I didn't want to paint them on myself since I don't have the steadiest hand, and I have the penmanship of a 5-year-old. So while I would have preferred a sans-serif font, I couldn't afford to be that picky.
The letters kept sticking to my fingers, so they're a bit... wibbley. But that's all right. Just eyeball the spacing. The ribbon was just wide enough for the "Public Call" part.
Then just glue it to your hat. And you could totally stop there if you really want to. You've got a perfectly good TARDIS hat. Obviously, I went further.
I added some glittery black ribbon because I found it with my crafting supplies, and it adds a little extra pizzazz. That's optional. But glitter is always recommended.
For the light on top, I used a plastic container that held a candy cane Christmas tree. I'd held onto it thinking it would be a good photo prop. I never used the Christmas tree, but the container was the right size, and I liked that it had a top I could use when I wanted to take the light out or turn it off. I just painted it with some glass paint. This was something else I found in my craft supplies (I went through a glass staining and etching phase), any paint would work, but the glass paint is less likely to chip. Then I just glued it to the top of the hat with more tacky glue.

The light itself is a self-contained LED that I found in the floral arrangement section of Michaels, in the aisle with the Styrofoam and marbles for the vases. It comes in different colors too.
And that's all it takes. I told you this was easy-mode. I might add a couple more embellishments, but for now I'll call this complete.

And because I know you want it: obligatory awkward selfie in the bathroom mirror.
I stick my tongue out at you, sir!
I kind of hate pictures of myself. Especially if I'm the one taking them. So my default mode is to be goofy. And yes, those are Stormtroopers dancing Gangnam Style on my t-shirt. In case the hat wasn't quite nerdy enough for you.

*Disclaimer: This post includes affiliate links*

September 11, 2013

Chocolate Cherry Push Up Cake Pops


You guys, me and cake pops do not get along.

First, the texture: they're basically soggy cake. It's cake crumbs, mixed together with a ton of frosting. It's mushy, and not in a good way like icebox cakes.

Secondly, the taste: they're too sweet. You've already got like a 1:1 cake to frosting ration, and then you dip it white chocolate candy melts.I may have a sweet tooth, but I don't like my sweets overly sweet, you know?

Thirdly, construction: they're fussy. Remember the Mr. Potato Heads I made for baby CC's first birthday party? Remember how it took me four and a half hours just to construct 19 of them? That doesn't include baking and cooling and chilling times. First you gotta bake the cake, then you gotta let it cool, then you crumble it, then you mix the crumbs with frosting, then you shape it all into balls, then you chill it, then you dip them in candy melts- and make sure you're super gentle when tapping off the excess, or it will fall off and you have to start all over again- then you have to decorate them. No thank you please!

But what I can't deny about cake pops is the wow factor. They're adorable. And it doesn't take much decorating skill to make them look decent, either. Let's face it: Everything's cuter on a stick.
Well, I've found the solution to my cake pop dilemma: push up cake pops. They're just like the push up ice cream pops you used to get as a kid from Annie the ice cream lady, but with cake and frosting instead. They're super easy, no special skills required, totally simple to put together, and still have the wow factor of cake on a stick. Plus, they're completely self-contained (the containers come with little tops), so they're even easier to transport than cupcakes. And where cake pops are one bite of soggy cake dipped it white chocolate, these are full, satisfying portions of cake, with a much better frosting-to-cake ratio, in my opinion.

Of course, you can use as much or as little frosting as you like. You're not making weirdy moldable cake mush; no one has the right to dictate just how much frosting you use!

Unless you run out. Then you're SOL.
Obviously, these do take one special piece of equipment: the push up pop containers themselves. I dithered for a while over whether or not to buy them, as I had no clue how often- if ever!- I'd use them, and single purpose items like that always make me hesitate. But because I'm me, and I'm easily swayed by cute things, I bought them. Because LOOKIT TEH CUTE!!!

And simple, oh-so simple. You just bake the cake in a jelly roll pan (or if you're me, and don't have a suitable jelly roll pan, you bake it in regular layers then split the layers) because you want it on the thinner side. Then just use the containers themselves to cut the cake into little circles. And then this gives you cake leavings to nom upon. (I'm reeeeaaaallllly tired right now, does it show? Nah)

Then you layer: cake, frosting, cake, frosting, cake, frosting, and a cherry on top. I didn't even use a tip to pipe in the frosting because it got smushed anyway. Just put it in a zip-top bag, snipped a corner, and squished it out.

If you like more frosting-to-cake, you might want to only put 2 layers of cake in the pops. As it was, the cherries got a little squished when I put the tops on. And brought them to baby CC's 2nd birthday, because I'm consistent like that.
You can buy the containers here. This is the same brand I used, and they work great. And they have new, taller tops, so no squished cherries for you!

Chocolate Cherry Push Up Cake Pops
Yield: About 12 pops

Ingredients
1 recipe Devil's Food Cake, or your favorite chocolate cake
3/4 cup unsalted butter, softened
2 cups powdered sugar
1/4 cup maraschino cherry juice
1/4 tsp. almond extract (optional)
12 maraschino cherries

Directions
Bake the cake as directed in a jelly roll pan* and allow to cool completely. While the cake is cooling, prepare the frosting: beat the butter with electric beaters on low speed. Gradually add in the powdered sugar. Add the cherry juice and almond extract. Gradually increase the speed to high, then whip until light and fluffy. Place in a pastry bag or zip top bag, and snip the corner

Using the pop molds, cut the cooled cake into small circles. Add the first layer of cake to the mold, then pipe the frosting on top. Continue to layer with cake and frosting until you reach the top of the mold, ending with the frosting. Top with a maraschino cherry.

Tip: Place the pop molds in a piece of Styrofoam to keep them upright while frosting. I was also able to use my cooling racks to do the same.

*Or bake in regular layers, then split in half with a sharp, serrated knife after cooling

Recipe by Kim

September 8, 2013

Individual Elvis Pies- Tailgating #SundaySupper

Peanut Butter, Banana, and Bacon Mini Pies


So, this week's #SundaySupper, hosted by Lane from Supper for a Steal, and it's about tailgating.

Which is a thing. That people do. Involving eating lots of food before watching sports. Right?

Obviously, it's not a thing that I do. Because sports and I, we're not the closest of acquaintances.
Source
But when I was thinking long and hard about it, I realized that the requirements for tailgate-party-type food were probably pretty similar to what I would serve at a tabletop game party. Finger foods, nothing that makes a mess, easy to eat, easy to clean, and won't get in the way of an epic D20 roll...

...Or, you know, a sort of sports type celebrating.

But when you think about it, there's not a whole lot of difference between gamers and sportsfans. I mean, fantasy football is totally just Dungeons & Dragons without the world building. Or different races. Or quest lines. Or treasure. So it's the boring version. And my brother even sent me the link to this Penny Arcade comic strip that explains football in gamer terms, and it makes so much sense now. See, if you can just figure out how to put it in the right terms, the gamers and sportsfans could totally get along.

(And now I've got that song from Oklahoma! stuck in my head, but instead of farmers and cowboys, I'm singing, "Ooooh, the gamer and the sportsfan should be frieeeeeeeeends....")

But one thing that definitely doesn't need translating: bacon.
Please note: I claim no affiliation to any football team. These are the things I stole from my family to take pictures. And my mommy knows Kellan Clemens.

I figured for that my usual cupcake fare wouldn't work too well for tailgating, (okay, so my brother told me that people don't eat cupcakes when tailgating. He also nixed the dragon and wizard decorating ideas. Spoilsport.) so I decided to manly it up. Bacon is robustly manly and quite a common ingredient in all the tailgate fare I've seen. I decided to turn the Elvis sandwich (peanut butter, banana, and bacon) into a hand pie.

And then all the custard kind of gooed out of the hand pies while baking. So I made them into tiny, adorable, individual pies instead. And I used a flower cookie cutter to do so because I thought it would be easier, and it made them more adorable in the process, and can we all just agree that manly is not my thing?
I'm not going to lie: the bacon is a little weird to encounter at first, but it all just kind of works together. The peanut butter and the banana. The banana and the maple syrup. The maple syrup and the bacon. All tied together with pie crust and a little sprinkle of cinnamon sugar on top.

They're the most adorable manly dessert you'll ever find.
Individual Elvis Pies
Yield: Approx. 32 mini pies

Ingredients
1 tbsp. unsalted butter
3 bananas, ripe but firm, sliced into coins
1 tbsp. brown sugar
¼ cup maple syrup, divided
3 eggs
½ cup sugar
2 cups heavy cream
1 cup creamy peanut butter
4 slices cooked bacon, well drained and crumbled, plus more for garnish
Pie crust for 2 pies
Cinnamon sugar

Directions
In a large skillet over medium heat, melt the butter. Add the sliced bananas and brown sugar and cook until the sugar is dissolved and the bananas start to brown. Add 1 tbsp. of maple syurp, stirring until the bananas are well coated. Remove from heat, and mash with a fork (I prefer to leave some lumps).

In a large mixing bowl, whisk the eggs, sugar, and remaining maple syrup together until light and fluffy. In a saucepan over low heat, heat the cream until it just begins to simmer, stirring occasionally to prevent a skin forming. Add the cream to the egg mixture one ladleful at a time, stirring constantly. When about half the cream has been added, stir in the peanut butter, then finish with the rest of the cream. Mix in the mashed bananas and crumbled bacon.

Preheat the oven to 425 degrees F. Spray a muffin tin with non-stick cooking spray. On a lightly floured surface, roll out the pie crust. Cut into 5-inch rounds using a cookie cutter (I used a flower cutter). Place the pie crust in the muffin tin, and fill with the peanut butter custard. Bake about 10 minutes, until the crust is golden brown and the custard is set. Top with more crumbled bacon and a sprinkle of cinnamon sugar, and allow to cool completely on wire racks.

Recipe by Kim
 

Gate your tails with the rest of the #SundaySupper group:

  Warm Ups (Appetizers):
Game Time (Main Dishes and Sides):
Overtime (Drinks and Desserts):
Join the #SundaySupper conversation on twitter each Sunday. We tweet throughout the day and share recipes from all over the world. Our weekly chat starts at 7:00 pm EST. Follow the #SundaySupper hashtag and remember to include it in your tweets to join in the chat. Check out our #SundaySupper Pinterest board for more fabulous recipes and food photos. Would you like to join the Sunday Supper Movement? It’s easy. You can sign up by clicking here → Sunday Supper Movement